
Page 216 - Enhancing CAD Drawings with Photoshop
P. 216
4386.book Page 200 Monday, November 15, 2004 3:27 PM
200 CHAPTER 6 ELEVATING THE ELEVATION
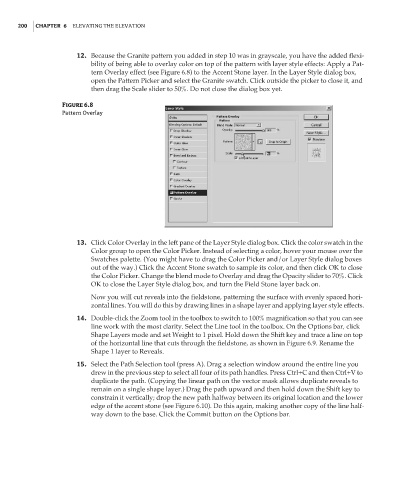
12. Because the Granite pattern you added in step 10 was in grayscale, you have the added flexi-
bility of being able to overlay color on top of the pattern with layer style effects: Apply a Pat-
tern Overlay effect (see Figure 6.8) to the Accent Stone layer. In the Layer Style dialog box,
open the Pattern Picker and select the Granite swatch. Click outside the picker to close it, and
then drag the Scale slider to 50%. Do not close the dialog box yet.
Figure 6.8
Pattern Overlay
13. Click Color Overlay in the left pane of the Layer Style dialog box. Click the color swatch in the
Color group to open the Color Picker. Instead of selecting a color, hover your mouse over the
Swatches palette. (You might have to drag the Color Picker and/or Layer Style dialog boxes
out of the way.) Click the Accent Stone swatch to sample its color, and then click OK to close
the Color Picker. Change the blend mode to Overlay and drag the Opacity slider to 70%. Click
OK to close the Layer Style dialog box, and turn the Field Stone layer back on.
Now you will cut reveals into the fieldstone, patterning the surface with evenly spaced hori-
zontal lines. You will do this by drawing lines in a shape layer and applying layer style effects.
14. Double-click the Zoom tool in the toolbox to switch to 100% magnification so that you can see
line work with the most clarity. Select the Line tool in the toolbox. On the Options bar, click
Shape Layers mode and set Weight to 1 pixel. Hold down the Shift key and trace a line on top
of the horizontal line that cuts through the fieldstone, as shown in Figure 6.9. Rename the
Shape 1 layer to Reveals.
15. Select the Path Selection tool (press A). Drag a selection window around the entire line you
drew in the previous step to select all four of its path handles. Press Ctrl+C and then Ctrl+V to
duplicate the path. (Copying the linear path on the vector mask allows duplicate reveals to
remain on a single shape layer.) Drag the path upward and then hold down the Shift key to
constrain it vertically; drop the new path halfway between its original location and the lower
edge of the accent stone (see Figure 6.10). Do this again, making another copy of the line half-
way down to the base. Click the Commit button on the Options bar.