Page 220 - Enhancing CAD Drawings with Photoshop
P. 220
4386.book  Page 204  Monday, November 15, 2004  3:27 PM

      204  CHAPTER 6  ELEVATING THE ELEVATION


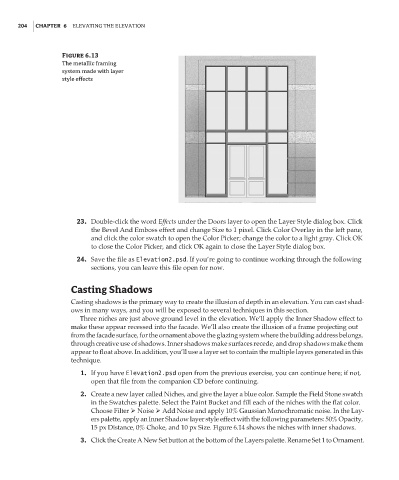
                  Figure 6.13
                  The metallic framing
                  system made with layer
                  style effects


                      23. Double-click the word Effects under the Doors layer to open the Layer Style dialog box. Click
                          the Bevel And Emboss effect and change Size to 1 pixel. Click Color Overlay in the left pane,
                          and click the color swatch to open the Color Picker; change the color to a light gray. Click OK
                          to close the Color Picker, and click OK again to close the Layer Style dialog box.
                      24. Save the file as Elevation2.psd. If you’re going to continue working through the following
                          sections, you can leave this file open for now.

                    Casting Shadows
                    Casting shadows is the primary way to create the illusion of depth in an elevation. You can cast shad-
                    ows in many ways, and you will be exposed to several techniques in this section.
                       Three niches are just above ground level in the elevation. We’ll apply the Inner Shadow effect to
                    make these appear recessed into the facade. We’ll also create the illusion of a frame projecting out
                    from the facade surface, for the ornament above the glazing system where the building address belongs,
                    through creative use of shadows. Inner shadows make surfaces recede, and drop shadows make them
                    appear to float above. In addition, you’ll use a layer set to contain the multiple layers generated in this
                    technique.
                       1. If you have Elevation2.psd open from the previous exercise, you can continue here; if not,
                          open that file from the companion CD before continuing.
                       2. Create a new layer called Niches, and give the layer a blue color. Sample the Field Stone swatch
                          in the Swatches palette. Select the Paint Bucket and fill each of the niches with the flat color.
                          Choose Filter   Noise   Add Noise and apply 10% Gaussian Monochromatic noise. In the Lay-
                          ers palette, apply an Inner Shadow layer style effect with the following parameters: 50% Opacity,
                          15 px Distance, 0% Choke, and 10 px Size. Figure 6.14 shows the niches with inner shadows.
                       3. Click the Create A New Set button at the bottom of the Layers palette. Rename Set 1 to Ornament.

