
Page 213 - Enhancing CAD Drawings with Photoshop
P. 213
4386.book Page 197 Monday, November 15, 2004 3:27 PM
SIMULATING TEXTURE 197
Simulating Texture
Perhaps the most important transformation made to a line drawing in Photoshop is simulating tex-
ture, because it gives the image realistic-looking surfaces. Let’s start by filling areas with flat color and
then texturize them by filtering with visual noise. In addition, you can add scans or photos of real
materials to your pattern library and then apply them to the elevation. Later in this section you will
learn how to cut reveals (gaps) into the stonework, patterning a surface with proportional lines.
1. If you have Elevation.psd open from the previous exercise, you can continue here; if not,
open that file from the Chapter 6 folder on the companion CD before continuing.
The Swatches palette can be a great aid if your project calls for a specific color scheme because
you can see all the colors you’ll be using for quick visual reference. Rather than try to remem-
ber the specific HSB or RGB values for particular colors, you can save them as swatches and
sample them throughout the project. You will add two such swatches representing the major
field and accent colors of cut stone used on the building facade.
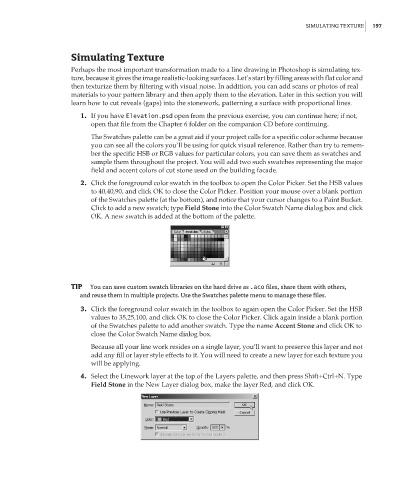
2. Click the foreground color swatch in the toolbox to open the Color Picker. Set the HSB values
to 40,40,90, and click OK to close the Color Picker. Position your mouse over a blank portion
of the Swatches palette (at the bottom), and notice that your cursor changes to a Paint Bucket.
Click to add a new swatch; type Field Stone into the Color Swatch Name dialog box and click
OK. A new swatch is added at the bottom of the palette.
TIP You can save custom swatch libraries on the hard drive as .aco files, share them with others,
and reuse them in multiple projects. Use the Swatches palette menu to manage these files.
3. Click the foreground color swatch in the toolbox to again open the Color Picker. Set the HSB
values to 35,25,100, and click OK to close the Color Picker. Click again inside a blank portion
of the Swatches palette to add another swatch. Type the name Accent Stone and click OK to
close the Color Swatch Name dialog box.
Because all your line work resides on a single layer, you’ll want to preserve this layer and not
add any fill or layer style effects to it. You will need to create a new layer for each texture you
will be applying.
4. Select the Linework layer at the top of the Layers palette, and then press Shift+Ctrl+N. Type
Field Stone in the New Layer dialog box, make the layer Red, and click OK.