
Page 325 - Enhancing CAD Drawings with Photoshop
P. 325
4386.book Page 309 Monday, November 15, 2004 3:27 PM
CREATING OPTIMIZED WEB PAGES WITH IMAGEREADY 309
Now that you’ve sliced the image, apply different optimization settings to selected slices to
reduce the overall file size (and loading time) of the web page. JPEG compression is preferable
for continuous tone images, and GIF is better for text (see the “Choosing a Compression For-
mat” sidebar earlier in this chapter).
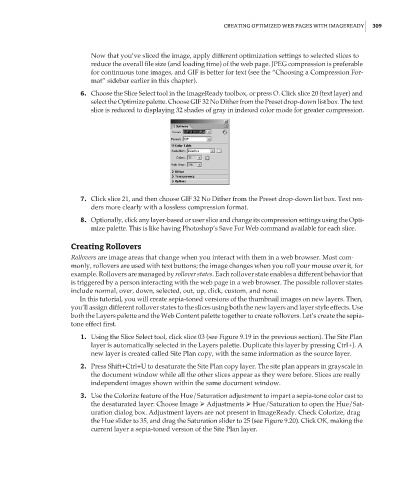
6. Choose the Slice Select tool in the ImageReady toolbox, or press O. Click slice 20 (text layer) and
select the Optimize palette. Choose GIF 32 No Dither from the Preset drop-down list box. The text
slice is reduced to displaying 32 shades of gray in indexed color mode for greater compression.
7. Click slice 21, and then choose GIF 32 No Dither from the Preset drop-down list box. Text ren-
ders more clearly with a lossless compression format.
8. Optionally, click any layer-based or user slice and change its compression settings using the Opti-
mize palette. This is like having Photoshop’s Save For Web command available for each slice.
Creating Rollovers
Rollovers are image areas that change when you interact with them in a web browser. Most com-
monly, rollovers are used with text buttons; the image changes when you roll your mouse over it, for
example. Rollovers are managed by rollover states. Each rollover state enables a different behavior that
is triggered by a person interacting with the web page in a web browser. The possible rollover states
include normal, over, down, selected, out, up, click, custom, and none.
In this tutorial, you will create sepia-toned versions of the thumbnail images on new layers. Then,
you’ll assign different rollover states to the slices using both the new layers and layer style effects. Use
both the Layers palette and the Web Content palette together to create rollovers. Let’s create the sepia-
tone effect first.
1. Using the Slice Select tool, click slice 03 (see Figure 9.19 in the previous section). The Site Plan
layer is automatically selected in the Layers palette. Duplicate this layer by pressing Ctrl+J. A
new layer is created called Site Plan copy, with the same information as the source layer.
2. Press Shift+Ctrl+U to desaturate the Site Plan copy layer. The site plan appears in grayscale in
the document window while all the other slices appear as they were before. Slices are really
independent images shown within the same document window.
3. Use the Colorize feature of the Hue/Saturation adjustment to impart a sepia-tone color cast to
the desaturated layer: Choose Image Adjustments Hue/Saturation to open the Hue/Sat-
uration dialog box. Adjustment layers are not present in ImageReady. Check Colorize, drag
the Hue slider to 35, and drag the Saturation slider to 25 (see Figure 9.20). Click OK, making the
current layer a sepia-toned version of the Site Plan layer.