
Page 103 - Excel Timesaving Techniques for Dummies
P. 103
20_574272 ch17.qxd 10/1/04 10:41 PM Page 88
88
Technique 17: Instant Range Formatting
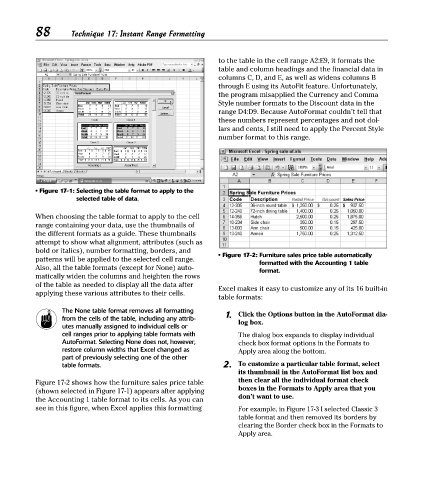
to the table in the cell range A2:E9, it formats the
table and column headings and the financial data in
columns C, D, and E, as well as widens columns B
through E using its AutoFit feature. Unfortunately,
the program misapplied the Currency and Comma
Style number formats to the Discount data in the
range D4:D9. Because AutoFormat couldn’t tell that
these numbers represent percentages and not dol-
lars and cents, I still need to apply the Percent Style
number format to this range.
• Figure 17-1: Selecting the table format to apply to the
selected table of data.
When choosing the table format to apply to the cell
range containing your data, use the thumbnails of
the different formats as a guide. These thumbnails
attempt to show what alignment, attributes (such as
bold or italics), number formatting, borders, and
• Figure 17-2: Furniture sales price table automatically
patterns will be applied to the selected cell range.
formatted with the Accounting 1 table
Also, all the table formats (except for None) auto-
format.
matically widen the columns and heighten the rows
of the table as needed to display all the data after
Excel makes it easy to customize any of its 16 built-in
applying these various attributes to their cells.
table formats:
The None table format removes all formatting 1. Click the Options button in the AutoFormat dia-
from the cells of the table, including any attrib- log box.
utes manually assigned to individual cells or
cell ranges prior to applying table formats with The dialog box expands to display individual
AutoFormat. Selecting None does not, however, check box format options in the Formats to
restore column widths that Excel changed as Apply area along the bottom.
part of previously selecting one of the other
table formats. 2. To customize a particular table format, select
its thumbnail in the AutoFormat list box and
Figure 17-2 shows how the furniture sales price table then clear all the individual format check
(shown selected in Figure 17-1) appears after applying boxes in the Formats to Apply area that you
don’t want to use.
the Accounting 1 table format to its cells. As you can
see in this figure, when Excel applies this formatting For example, in Figure 17-3 I selected Classic 3
table format and then removed its borders by
clearing the Border check box in the Formats to
Apply area.