
Page 67 - Excel Timesaving Techniques for Dummies
P. 67
11_574272 ch09.qxd 10/1/04 10:37 PM Page 52
52
Technique 9: Navigating the Worksheet in a Snap
Zooming Out to Get
the Big Picture
The last procedure for finding your desired place in
a worksheet and getting there is a visual one. Here
are the general steps you follow:
1. Use the Zoom feature to zoom out on the work-
sheet until you can see the cell range or embed-
ded chart you want to work with.
2. Click somewhere in the range or chart to set
the cell pointer in it.
3. Use the Zoom feature to zoom in on the new
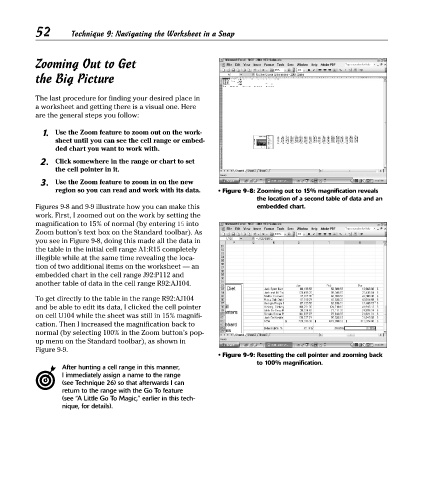
region so you can read and work with its data. • Figure 9-8: Zooming out to 15% magnification reveals
the location of a second table of data and an
Figures 9-8 and 9-9 illustrate how you can make this embedded chart.
work. First, I zoomed out on the work by setting the
magnification to 15% of normal (by entering 15 into
Zoom button’s text box on the Standard toolbar). As
you see in Figure 9-8, doing this made all the data in
the table in the initial cell range A1:R15 completely
illegible while at the same time revealing the loca-
tion of two additional items on the worksheet — an
embedded chart in the cell range J92:P112 and
another table of data in the cell range R92:AJ104.
To get directly to the table in the range R92:AJ104
and be able to edit its data, I clicked the cell pointer
on cell U104 while the sheet was still in 15% magnifi-
cation. Then I increased the magnification back to
normal (by selecting 100% in the Zoom button’s pop-
up menu on the Standard toolbar), as shown in
Figure 9-9.
• Figure 9-9: Resetting the cell pointer and zooming back
to 100% magnification.
After hunting a cell range in this manner,
I immediately assign a name to the range
(see Technique 26) so that afterwards I can
return to the range with the Go To feature
(see “A Little Go To Magic,” earlier in this tech-
nique, for details).