
Page 69 - Excel Timesaving Techniques for Dummies
P. 69
12_574272 ch10.qxd 10/1/04 10:37 PM Page 54
54
Technique 10: Making the Most Efficient Cell Selections
4. Repeat Steps 2 and 3 until you select all the
ranges you want included in the noncontiguous
cell selection.
AutoSelect at Your Service
AutoSelect is a great timesaving feature that enables
you to select an entire table of data as a single cell
selection in a couple of double-clicks of the mouse.
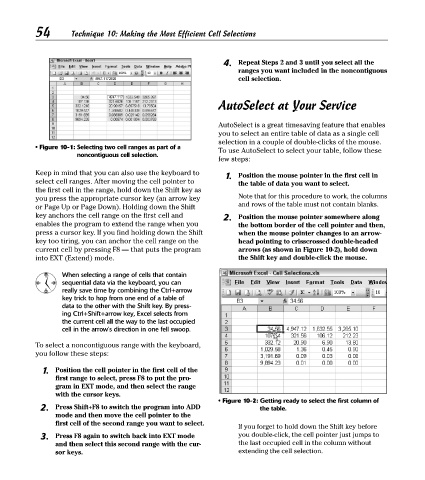
• Figure 10-1: Selecting two cell ranges as part of a
To use AutoSelect to select your table, follow these
noncontiguous cell selection.
few steps:
Keep in mind that you can also use the keyboard to 1. Position the mouse pointer in the first cell in
select cell ranges. After moving the cell pointer to the table of data you want to select.
the first cell in the range, hold down the Shift key as
you press the appropriate cursor key (an arrow key Note that for this procedure to work, the columns
and rows of the table must not contain blanks.
or Page Up or Page Down). Holding down the Shift
key anchors the cell range on the first cell and 2. Position the mouse pointer somewhere along
enables the program to extend the range when you the bottom border of the cell pointer and then,
press a cursor key. If you find holding down the Shift when the mouse pointer changes to an arrow-
key too tiring, you can anchor the cell range on the head pointing to crisscrossed double-headed
current cell by pressing F8 — that puts the program arrows (as shown in Figure 10-2), hold down
into EXT (Extend) mode. the Shift key and double-click the mouse.
When selecting a range of cells that contain
sequential data via the keyboard, you can
really save time by combining the Ctrl+arrow
key trick to hop from one end of a table of
data to the other with the Shift key. By press-
ing Ctrl+Shift+arrow key, Excel selects from
the current cell all the way to the last occupied
cell in the arrow’s direction in one fell swoop.
To select a noncontiguous range with the keyboard,
you follow these steps:
1. Position the cell pointer in the first cell of the
first range to select, press F8 to put the pro-
gram in EXT mode, and then select the range
with the cursor keys.
• Figure 10-2: Getting ready to select the first column of
2. Press Shift+F8 to switch the program into ADD the table.
mode and then move the cell pointer to the
first cell of the second range you want to select.
If you forget to hold down the Shift key before
3. Press F8 again to switch back into EXT mode you double-click, the cell pointer just jumps to
and then select this second range with the cur- the last occupied cell in the column without
sor keys. extending the cell selection.