
Page 203 - Excel Workbook for Dummies
P. 203
21_798452 ch15.qxp 3/13/06 7:41 PM Page 186
186 Part III: Working with Graphics
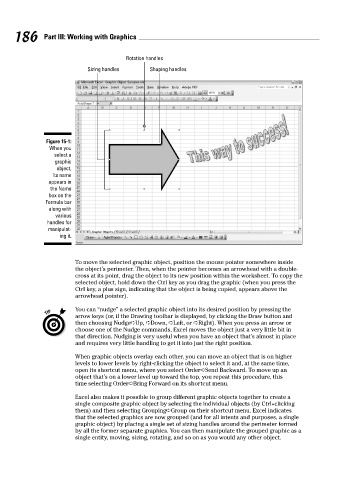
Rotation handles
Sizing handles Shaping handles
Figure 15-1:
When you
select a
graphic
object,
its name
appears in
the Name
box on the
Formula bar
along with
various
handles for
manipulat-
ing it.
To move the selected graphic object, position the mouse pointer somewhere inside
the object’s perimeter. Then, when the pointer becomes an arrowhead with a double-
cross at its point, drag the object to its new position within the worksheet. To copy the
selected object, hold down the Ctrl key as you drag the graphic (when you press the
Ctrl key, a plus sign, indicating that the object is being copied, appears above the
arrowhead pointer).
You can “nudge” a selected graphic object into its desired position by pressing the
arrow keys (or, if the Drawing toolbar is displayed, by clicking the Draw button and
then choosing Nudge➪Up, ➪Down, ➪Left, or ➪Right). When you press an arrow or
choose one of the Nudge commands, Excel moves the object just a very little bit in
that direction. Nudging is very useful when you have an object that’s almost in place
and requires very little handling to get it into just the right position.
When graphic objects overlay each other, you can move an object that is on higher
levels to lower levels by right-clicking the object to select it and, at the same time,
open its shortcut menu, where you select Order➪Send Backward. To move up an
object that’s on a lower level up toward the top, you repeat this procedure, this
time selecting Order➪Bring Forward on its shortcut menu.
Excel also makes it possible to group different graphic objects together to create a
single composite graphic object by selecting the individual objects (by Ctrl+clicking
them) and then selecting Grouping➪Group on their shortcut menu. Excel indicates
that the selected graphics are now grouped (and for all intents and purposes, a single
graphic object) by placing a single set of sizing handles around the perimeter formed
by all the former separate graphics. You can then manipulate the grouped graphic as a
single entity, moving, sizing, rotating, and so on as you would any other object.