
Page 208 - Excel Workbook for Dummies
P. 208
21_798452 ch15.qxp 3/13/06 7:41 PM Page 191
Chapter 15: Adding Graphics to the Spreadsheet 191
After all your selected images are downloaded, the Microsoft Clip Organizer
dialog box automatically opens.
8. Verify that your kite images are successfully downloaded by clicking the
Downloaded Clips folder in the left pane of the Microsoft Clip Organizer
dialog box.
Excel displays all the clip art images you downloaded from the Microsoft Office Clip
Art and Media Home Page on the right side of the dialog box. You can then move
these images into appropriate folders (such as Leisure or Sports) if you so desire.
9. Close the Microsoft Office Clip Art and Media Home Page and your browser. In
Excel close the Microsoft Clip Organizer dialog box and select the Go button
again to rerun the search for kite clip art images.
This time, Excel finds all the kite images you downloaded from the Microsoft
Office Clip Art and Media Home Page along with the sole local image.
10. In Clip Art task pane, click the thumbnail of the kite image you want to add to
the invoice header.
Excel immediately inserts a copy of the image into the worksheet.
11. Drag the kite image to the right side of the invoice header and then use its sizing
handles to resize the graphic so that it fits entirely within the blue background.
Note that selected clip art images have only sizing handles — these images do
not offer a rotation handle for changing the orientation or a shaping handle for
manipulating the shape.
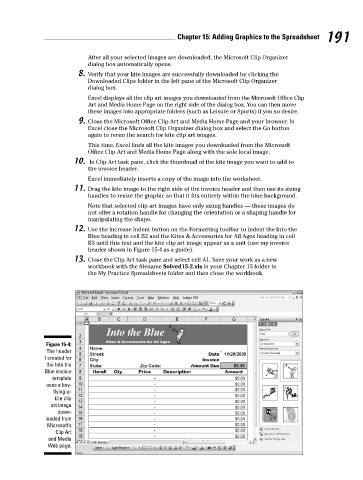
12. Use the Increase Indent button on the Formatting toolbar to indent the Into the
Blue heading in cell B2 and the Kites & Accessories for All Ages heading in cell
B3 until this text and the kite clip art image appear as a unit (use my invoice
header shown in Figure 15-4 as a guide).
13. Close the Clip Art task pane and select cell A1. Save your work as a new
workbook with the filename Solved15-2.xls in your Chapter 15 folder in
the My Practice Spreadsheets folder and then close the workbook.
Figure 15-4:
The header
I created for
the Into the
Blue invoice
template
uses a boy-
flying-a-
kite clip
art image
down-
loaded from
Microsoft’s
Clip Art
and Media
Web page.