
Page 204 - Excel Workbook for Dummies
P. 204
21_798452 ch15.qxp 3/13/06 7:41 PM Page 187
Chapter 15: Adding Graphics to the Spreadsheet 187
The great thing about grouping a bunch of different objects is that Excel never forgets
that they were once separate objects that you could independently manipulate. That
means that you can always turn them back into separate graphics by ungrouping
them. To do this, right-click the composite graphic object and then choose
Grouping➪Ungroup on its shortcut menu.
Try It
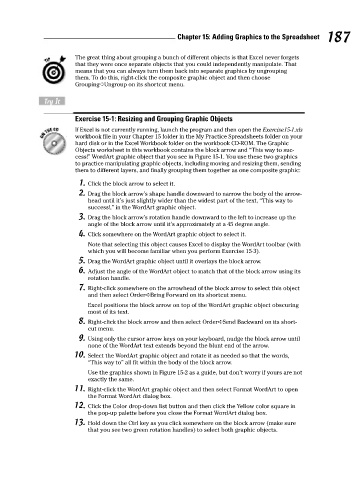
Exercise 15-1: Resizing and Grouping Graphic Objects
If Excel is not currently running, launch the program and then open the Exercise15-1.xls
workbook file in your Chapter 15 folder in the My Practice Spreadsheets folder on your
hard disk or in the Excel Workbook folder on the workbook CD-ROM. The Graphic
Objects worksheet in this workbook contains the block arrow and “This way to suc-
cess!” WordArt graphic object that you see in Figure 15-1. You use these two graphics
to practice manipulating graphic objects, including moving and resizing them, sending
them to different layers, and finally grouping them together as one composite graphic:
1. Click the block arrow to select it.
2. Drag the block arrow’s shape handle downward to narrow the body of the arrow-
head until it’s just slightly wider than the widest part of the text, “This way to
success!,” in the WordArt graphic object.
3. Drag the block arrow’s rotation handle downward to the left to increase up the
angle of the block arrow until it’s approximately at a 45 degree angle.
4. Click somewhere on the WordArt graphic object to select it.
Note that selecting this object causes Excel to display the WordArt toolbar (with
which you will become familiar when you perform Exercise 15-3).
5. Drag the WordArt graphic object until it overlays the block arrow.
6. Adjust the angle of the WordArt object to match that of the block arrow using its
rotation handle.
7. Right-click somewhere on the arrowhead of the block arrow to select this object
and then select Order➪Bring Forward on its shortcut menu.
Excel positions the block arrow on top of the WordArt graphic object obscuring
most of its text.
8. Right-click the block arrow and then select Order➪Send Backward on its short-
cut menu.
9. Using only the cursor arrow keys on your keyboard, nudge the block arrow until
none of the WordArt text extends beyond the blunt end of the arrow.
10. Select the WordArt graphic object and rotate it as needed so that the words,
“This way to” all fit within the body of the block arrow.
Use the graphics shown in Figure 15-2 as a guide, but don’t worry if yours are not
exactly the same.
11. Right-click the WordArt graphic object and then select Format WordArt to open
the Format WordArt dialog box.
12. Click the Color drop-down list button and then click the Yellow color square in
the pop-up palette before you close the Format WordArt dialog box.
13. Hold down the Ctrl key as you click somewhere on the block arrow (make sure
that you see two green rotation handles) to select both graphic objects.