
Page 210 - Excel Workbook for Dummies
P. 210
21_798452 ch15.qxp 3/13/06 7:41 PM Page 193
Chapter 15: Adding Graphics to the Spreadsheet 193
You can also use the tools on the Picture toolbar to edit the photo. Among other things,
these tools make it possible to heighten or lessen the brightness or contrast of the
image, crop out unwanted areas around the edges, and compress the image so that it
doesn’t bulk up the size of your workbook (as only high resolution images can).
If you have a scanner or digital camera connected to your computer, you can use
Excel’s Insert➪Picture➪From Scanner or Camera command to bring a scanned image
or digital photo that you’ve taken directly into your Excel worksheet.
Try It
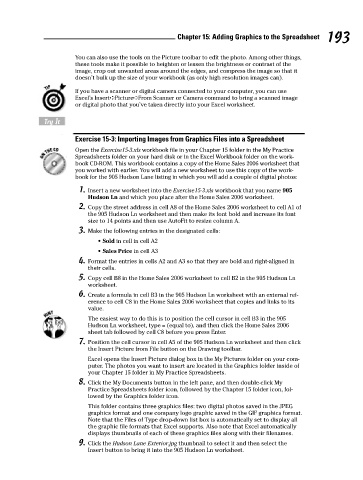
Exercise 15-3: Importing Images from Graphics Files into a Spreadsheet
Open the Exercise15-3.xls workbook file in your Chapter 15 folder in the My Practice
Spreadsheets folder on your hard disk or in the Excel Workbook folder on the work-
book CD-ROM. This workbook contains a copy of the Home Sales 2006 worksheet that
you worked with earlier. You will add a new worksheet to use this copy of the work-
book for the 905 Hudson Lane listing in which you will add a couple of digital photos:
1. Insert a new worksheet into the Exercise15-3.xls workbook that you name 905
Hudson Ln and which you place after the Home Sales 2006 worksheet.
2. Copy the street address in cell A8 of the Home Sales 2006 worksheet to cell A1 of
the 905 Hudson Ln worksheet and then make its font bold and increase its font
size to 14 points and then use AutoFit to resize column A.
3. Make the following entries in the designated cells:
• Sold in cell in cell A2
• Sales Price in cell A3
4. Format the entries in cells A2 and A3 so that they are bold and right-aligned in
their cells.
5. Copy cell B8 in the Home Sales 2006 worksheet to cell B2 in the 905 Hudson Ln
worksheet.
6. Create a formula in cell B3 in the 905 Hudson Ln worksheet with an external ref-
erence to cell C8 in the Home Sales 2006 worksheet that copies and links to its
value.
The easiest way to do this is to position the cell cursor in cell B3 in the 905
Hudson Ln worksheet, type = (equal to), and then click the Home Sales 2006
sheet tab followed by cell C8 before you press Enter.
7. Position the cell cursor in cell A5 of the 905 Hudson Ln worksheet and then click
the Insert Picture from File button on the Drawing toolbar.
Excel opens the Insert Picture dialog box in the My Pictures folder on your com-
puter. The photos you want to insert are located in the Graphics folder inside of
your Chapter 15 folder in My Practice Spreadsheets.
8. Click the My Documents button in the left pane, and then double-click My
Practice Spreadsheets folder icon, followed by the Chapter 15 folder icon, fol-
lowed by the Graphics folder icon.
This folder contains three graphics files: two digital photos saved in the JPEG
graphics format and one company logo graphic saved in the GIF graphics format.
Note that the Files of Type drop-down list box is automatically set to display all
the graphic file formats that Excel supports. Also note that Excel automatically
displays thumbnails of each of these graphics files along with their filenames.
9. Click the Hudson Lane Exterior.jpg thumbnail to select it and then select the
Insert button to bring it into the 905 Hudson Ln worksheet.