
Page 47 - Excel Workbook for Dummies
P. 47
06_798452 ch02.qxp 3/13/06 7:34 PM Page 30
30 Part I: Creating Spreadsheets
9. Enter the number 20012551 in cell B15 and then format it with the Special Social
Security Number format.
10. Check your results against those on Sheet1 in the workbook file, Solved2-4.xls,
and then when everything checks out, save your practice workbook in your My
Practice Spreadsheets folder inside My Documents under the filename Number
Formatting Practice.xls. Close the workbook.
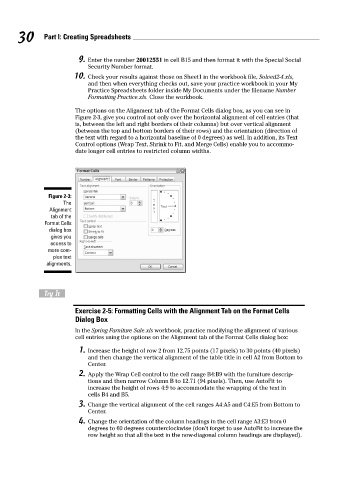
The options on the Alignment tab of the Format Cells dialog box, as you can see in
Figure 2-3, give you control not only over the horizontal alignment of cell entries (that
is, between the left and right borders of their columns) but over vertical alignment
(between the top and bottom borders of their rows) and the orientation (direction of
the text with regard to a horizontal baseline of 0 degrees) as well. In addition, its Text
Control options (Wrap Text, Shrink to Fit, and Merge Cells) enable you to accommo-
date longer cell entries to restricted column widths.
Figure 2-3:
The
Alignment
tab of the
Format Cells
dialog box
gives you
access to
more com-
plex text
alignments.
Try It
Exercise 2-5: Formatting Cells with the Alignment Tab on the Format Cells
Dialog Box
In the Spring Furniture Sale.xls workbook, practice modifying the alignment of various
cell entries using the options on the Alignment tab of the Format Cells dialog box:
1. Increase the height of row 2 from 12.75 points (17 pixels) to 30 points (40 pixels)
and then change the vertical alignment of the table title in cell A2 from Bottom to
Center.
2. Apply the Wrap Cell control to the cell range B4:B9 with the furniture descrip-
tions and then narrow Column B to 12.71 (94 pixels). Then, use AutoFit to
increase the height of rows 4:9 to accommodate the wrapping of the text in
cells B4 and B5.
3. Change the vertical alignment of the cell ranges A4:A5 and C4:E5 from Bottom to
Center.
4. Change the orientation of the column headings in the cell range A3:E3 from 0
degrees to 60 degrees counterclockwise (don’t forget to use AutoFit to increase the
row height so that all the text in the now-diagonal column headings are displayed).