
Page 111 - Programming the Raspberry Pi Getting Started with Python
P. 111
LEFT and RIGHT ARROW keys; an LED should light that corresponds to the key you pressed.
We are not going to have leads trailing from our robot to a monitor and mouse, so we need to
arrange for this program to automatically start when our Raspberry Pi has finished booting up. To do
this, we need to place the file raspirobot_basic.desktop (included in the “code” directory) into a
directory named /home/pi/.config/autostart. You can do all this with the File Manager. Just type
/home/pi/.config in the address bar at the top of the screen. Note that directories that start with a dot
are hidden, so you cannot navigate to it in the File Manager simply by clicking.
If there is no directory inside.config called autostart, so create one and copy the file
raspirobot_basic.desktop into it. We can make sure our autostart works by rebooting the Pi. If all goes
well, the pygame window will appear automatically.
We will return later to look at the code for this project, but for now, let’s just get everything
working.
Step 4: Connect the Motors
Shut down and disconnect the Raspberry Pi from its power supply. Be sure to put it away so that you
do not accidentally apply both it and the battery connection. Put the batteries into the battery holder
and fix the top plate of the chassis into place. Cover the metal screws with little patches of insulating
tape or Scotch tape to prevent accidental shorts with the Raspberry Pi and then slip the Pi under the
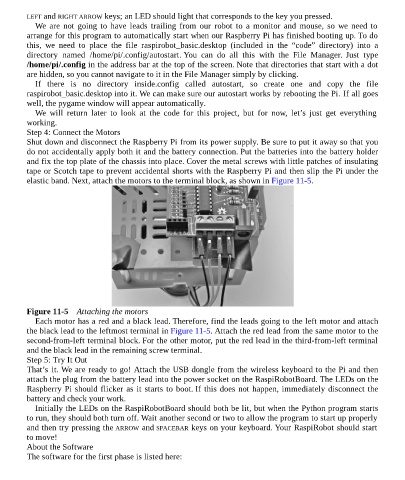
elastic band. Next, attach the motors to the terminal block, as shown in Figure 11-5.
Figure 11-5 Attaching the motors
Each motor has a red and a black lead. Therefore, find the leads going to the left motor and attach
the black lead to the leftmost terminal in Figure 11-5. Attach the red lead from the same motor to the
second-from-left terminal block. For the other motor, put the red lead in the third-from-left terminal
and the black lead in the remaining screw terminal.
Step 5: Try It Out
That’s it. We are ready to go! Attach the USB dongle from the wireless keyboard to the Pi and then
attach the plug from the battery lead into the power socket on the RaspiRobotBoard. The LEDs on the
Raspberry Pi should flicker as it starts to boot. If this does not happen, immediately disconnect the
battery and check your work.
Initially the LEDs on the RaspiRobotBoard should both be lit, but when the Python program starts
to run, they should both turn off. Wait another second or two to allow the program to start up properly
and then try pressing the ARROW and SPACEBAR keys on your keyboard. Your RaspiRobot should start
to move!
About the Software
The software for the first phase is listed here: