
Page 114 - Programming the Raspberry Pi Getting Started with Python
P. 114
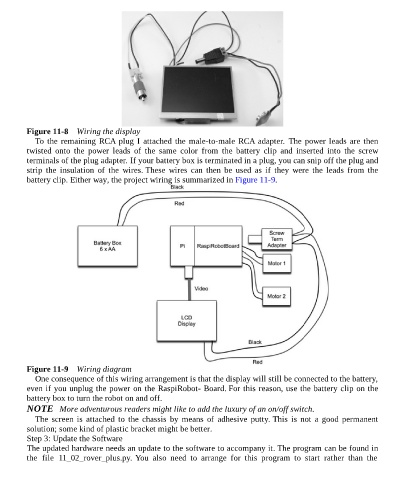
Figure 11-8    Wiring the display
             To the remaining RCA plug I attached the male-to-male RCA adapter.  The power leads are then
          twisted  onto  the  power  leads  of  the  same  color  from  the  battery  clip  and  inserted  into  the  screw
          terminals of the plug adapter. If your battery box is terminated in a plug, you can snip off the plug and
          strip  the  insulation  of  the  wires. These  wires  can  then  be  used  as  if  they  were  the  leads  from  the
          battery clip. Either way, the project wiring is summarized in Figure 11-9.


          Figure 11-9    Wiring diagram
             One consequence of this wiring arrangement is that the display will still be connected to the battery,
          even if you unplug the power on the RaspiRobot- Board. For this reason, use the battery clip on the
          battery box to turn the robot on and off.

          NOTE   More adventurous readers might like to add the luxury of an on/off switch.
             The  screen  is  attached  to  the  chassis  by  means  of  adhesive  putty. This  is  not  a  good  permanent
          solution; some kind of plastic bracket might be better.
          Step 3: Update the Software
          The updated hardware needs an update to the software to accompany it. The program can be found in
          the  file  11_02_rover_plus.py. You  also  need  to  arrange  for  this  program  to  start  rather  than  the