
Page 106 - Robot Builder's Bonanza
P. 106
THE WOODCUTTER’S ART 75
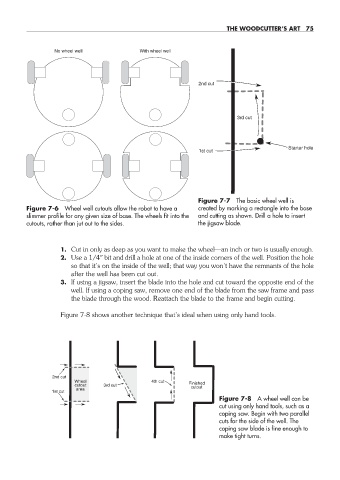
No wheel well With wheel well
2nd cut
3rd cut
Starter hole
1st cut
Figure 7-7 The basic wheel well is
Figure 7-6 Wheel well cutouts allow the robot to have a created by marking a rectangle into the base
slimmer profile for any given size of base. The wheels fit into the and cutting as shown. Drill a hole to insert
cutouts, rather than jut out to the sides. the jigsaw blade.
1. Cut in only as deep as you want to make the wheel— an inch or two is usually enough.
2. Use a 1/4″ bit and drill a hole at one of the inside corners of the well. Position the hole
so that it’s on the inside of the well; that way you won’t have the remnants of the hole
after the well has been cut out.
3. If using a jigsaw, insert the blade into the hole and cut toward the opposite end of the
well. If using a coping saw, remove one end of the blade from the saw frame and pass
the blade through the wood. Reattach the blade to the frame and begin cutting.
Figure 7-8 shows another technique that’s ideal when using only hand tools.
2nd cut
Wheel 4th cut Finished
cutout 3rd cut cutout
area
1st cut
Figure 7-8 A wheel well can be
cut using only hand tools, such as a
coping saw. Begin with two parallel
cuts for the side of the well. The
coping saw blade is fine enough to
make tight turns.
07-chapter-7.indd 75 4/21/11 11:44 AM