
Page 109 - Robot Builder's Bonanza
P. 109
78 WORKING WITH WOOD
Now for the adjoining frame piece. Align it to the corner you just assembled. Using the
other “leg” of the bracket, mark a hole in the second piece. As you did before, drill the hole
and finish the corner by adding the fasteners.
Put this corner aside, and repeat the steps for the lower- right corner. When done you will
have the top left side of the frame as one piece and the bottom right side as the other piece.
Complete the frame the rest of the way by carefully lining up the corners, marking, drilling,
and assembling with fasteners.
I don’t recommend assembly techniques using nails, staples, or glue. Though these are cheaper
G and may take less time, the finished frame isn’t strong enough for robot use. Besides, when
using hardware brackets and fasteners you can readily disassemble the frame pieces should
you decide to rebuild it.
DRILLING WOOD
Holes are for mounting things to your robot, and holes are made with the drill and bit. You
can use a hand or electric power drill to make holes in wood. Electric drills are great and do
the job fast, but you can also use a hand drill if you feel uncomfortable with power tools. Either
way, it’s important that you use only sharp drill bits. If your bits are dull, replace them or have
them sharpened.
It’s important that you drill straight holes, or your robot may not go together properly. If
you have a drill press, and it’s large enough, you can use it to drill perfectly straight holes in
plywood and other large wood stock.
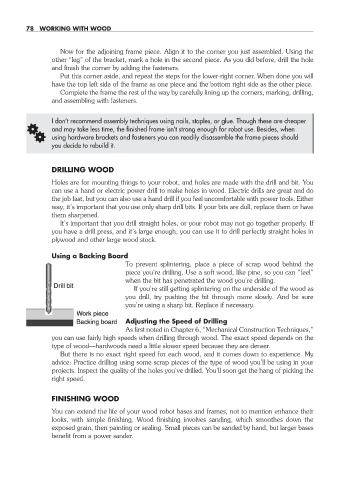
Using a Backing Board
To prevent splintering, place a piece of scrap wood behind the
piece you’re drilling. Use a soft wood, like pine, so you can “feel”
when the bit has penetrated the wood you’re drilling.
If you’re still getting splintering on the underside of the wood as
you drill, try pushing the bit through more slowly. And be sure
you’re using a sharp bit. Replace if necessary.
Adjusting the Speed of Drilling
As first noted in Chapter 6, “Mechanical Construction Techniques,”
you can use fairly high speeds when drilling through wood. The exact speed depends on the
type of wood— hardwoods need a little slower speed because they are denser.
But there is no exact right speed for each wood, and it comes down to experience. My
advice: Practice drilling using some scrap pieces of the type of wood you’ll be using in your
projects. Inspect the quality of the holes you’ve drilled. You’ll soon get the hang of picking the
right speed.
FINISHING WOOD
You can extend the life of your wood robot bases and frames, not to mention enhance their
looks, with simple finishing. Wood finishing involves sanding, which smoothes down the
exposed grain, then painting or sealing. Small pieces can be sanded by hand, but larger bases
benefit from a power sander.
07-chapter-7.indd 78 4/21/11 11:44 AM