Page 128 - Six Sigma Demystified
P. 128
Chapter 5  m e a s u r e   s tag e        109


                           unit, still may have bias because it may be consistently wrong! Bias is a simple,
                           consistent offset in the estimate, and it can be corrected through calibration of
                           the measurement system, much like watches are synchronized for accuracy.
                           Measurement systems need to be analyzed for stability to ensure that their
                           accuracy does not degrade over time. While this is often not a concern during
                           the short time period of a Six Sigma project, it may become a concern for
                           future control of the process improvements.
                             Another concern is that of linearity: Does the measurement system provide
                           the same level of accuracy across its full range of use? If the error is higher for
                           larger measurements, then the estimates of variation in these cases are inflated,
                           which will have an unfavorable effect on improvement and control efforts.
                             Unfortunately, even a regularly calibrated measurement system may be sub-
                           ject to additional sources of error.
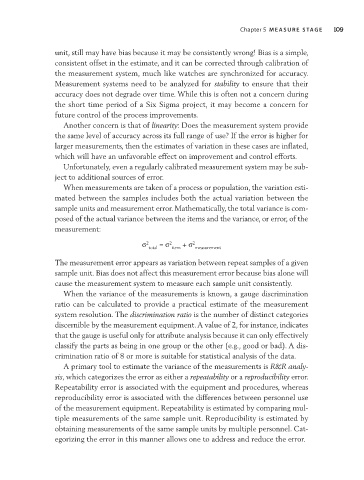
                             When measurements are taken of a process or population, the variation esti-
                           mated between the samples includes both the actual variation between the
                           sample units and measurement error. Mathematically, the total variance is com-
                           posed of the actual variance between the items and the variance, or error, of the
                           measurement:

                                                   s 2 total  = s 2 item  + s 2 measurement

                           The measurement error appears as variation between repeat samples of a given
                           sample unit. Bias does not affect this measurement error because bias alone will
                           cause the measurement system to measure each sample unit consistently.
                             When the variance of the measurements is known, a gauge discrimination
                           ratio can be calculated to provide a practical estimate of the measurement
                           system resolution. The discrimination ratio is the number of distinct categories

                           discernible by the measurement equipment. A value of 2, for instance, indicates
                           that the gauge is useful only for attribute analysis because it can only effectively
                           classify the parts as being in one group or the other (e.g., good or bad). A dis-
                           crimination ratio of 8 or more is suitable for statistical analysis of the data.
                             A primary tool to estimate the variance of the measurements is R&R analy-
                           sis, which categorizes the error as either a repeatability or a reproducibility error.
                           Repeatability error is associated with the equipment and procedures, whereas
                           reproducibility error is associated with the differences between personnel use
                           of the measurement equipment. Repeatability is estimated by comparing mul-
                           tiple measurements of the same sample unit. Reproducibility is estimated by
                           obtaining measurements of the same sample units by multiple personnel. Cat-
                           egorizing the error in this manner allows one to address and reduce the error.

