Page 130 - Structural Steel Designers Handbook AISC, AASHTO, AISI, ASTM, and ASCE-07 Design Standards
P. 130
Brockenbrough_Ch03.qxd 9/29/05 5:05 PM Page 3.62
CONNECTIONS
3.62 CHAPTER THREE
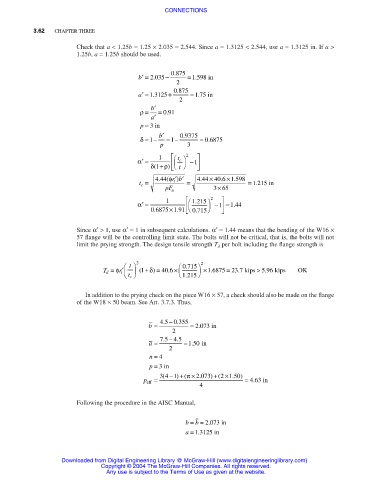
Check that a < 1.25b = 1.25 × 2.035 = 2.544. Since a = 1.3125 < 2.544, use a = 1.3125 in. If a >
1.25b, a = 1.25b should be used.
.
.
.
b ′ = 2 035 − 0 875 = 1 598 in
2
.
a ′ = 1 3125 + 0 875 = 175 in
.
.
2
ρ = ′ b = 091
.
′ a
p = 3 in
.
δ =− ′ b =− 0 9375 = 0 6875.
1
1
p 3
α ′ = 1 t c 2 − 1
δ 1 ( + ρ) t
′′
φ )
.
.
.(
t
.
t c = 4 44 rb = 4 44 × 40 6 . ×1 598 = 1 215 in
×
pF u 365
.
α ′ = 1 1 215 2 − 1 = 144
.
0 6875 ×1 91 0 715
.
.
.
Since α′ > 1, use α′ = 1 in subsequent calculations. α′ = 1.44 means that the bending of the W16 ×
57 flange will be the controlling limit state. The bolts will not be critical, that is, the bolts will not
limit the prying strength. The design tensile strength T d per bolt including the flange strength is
t 2 . 2
T = φ r′ 1 ( + δ) = 40 6 . × 0 715 ×1 6875 23 7 . kips > 5 96 kips OK
=
.
.
d
t
t
1 215
.
c
In addition to the prying check on the piece W16 × 57, a check should also be made on the flange
of the W18 × 50 beam. See Art. 3.7.3. Thus,
b = 4.5 − 0.355 = 2.073 in
2
a = 75 . − 45 . = 150. in
2
n = 4
p = in3
+
(
p eff = 3 4 −1) (π × 2 073. ) + 2( ×1 50. ) = 463 in
.
4
Following the procedure in the AISC Manual,
b
b == 2 073 in
.
a = 1 3125 in
.
Downloaded from Digital Engineering Library @ McGraw-Hill (www.digitalengineeringlibrary.com)
Copyright © 2004 The McGraw-Hill Companies. All rights reserved.
Any use is subject to the Terms of Use as given at the website.

