Page 488 - Wind Energy Handbook
P. 488
462                                                     COMPONENT DESIGN


          Deutscher Ingenieure, 1986), VDI 2230, gives a method for calculating the bolt load
          increment as a proportion of the load increment in the ‘tributary’ width of tower
          wall under these conditions. The axial loading on the flanged joint and the effect of
          the moment due to the eccentricity of loading are considered separately. The axial
          load is assumed to be shared between the bolt and the preloaded flanges in
          proportion to the stiffnesses of the load paths, which, in the case of the flanges, is
          based on a reduced cross-sectional area related to the volume compressed by the
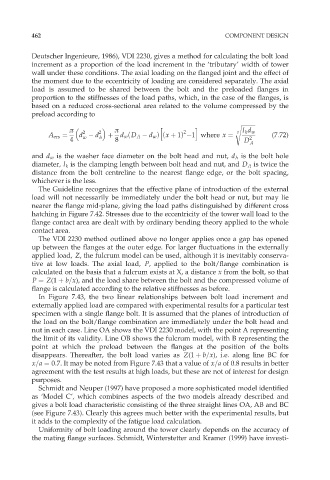
          preload according to

                     ð            ð            h      2  i           s ffiffiffiffiffiffiffiffiffiffi
                                                                       l k d w
                         2
                                                ð
                                      ð
               A ers ¼  d   d 2 h  þ  d w D A   d w Þ x þ 1Þ  1 where x ¼  3   (7:72)
                         w
                     4            8                                    D 2 A
          and d w is the washer face diameter on the bolt head and nut, d h is the bolt hole
          diameter, l k is the clamping length between bolt head and nut, and D A is twice the
          distance from the bolt centreline to the nearest flange edge, or the bolt spacing,
          whichever is the less.
            The Guideline recognizes that the effective plane of introduction of the external
          load will not necessarily be immediately under the bolt head or nut, but may lie
          nearer the flange mid-plane, giving the load paths distinguished by different cross
          hatching in Figure 7.42. Stresses due to the eccentricity of the tower wall load to the
          flange contact area are dealt with by ordinary bending theory applied to the whole
          contact area.
            The VDI 2230 method outlined above no longer applies once a gap has opened
          up between the flanges at the outer edge. For larger fluctuations in the externally
          applied load, Z, the fulcrum model can be used, although it is inevitably conserva-
          tive at low loads. The axial load, P, applied to the bolt/flange combination is
          calculated on the basis that a fulcrum exists at X, a distance x from the bolt, so that
          P ¼ Z(1 þ b=x), and the load share between the bolt and the compressed volume of
          flange is calculated according to the relative stiffnesses as before.
            In Figure 7.43, the two linear relationships between bolt load increment and
          externally applied load are compared with experimental results for a particular test
          specimen with a single flange bolt. It is assumed that the planes of introduction of
          the load on the bolt/flange combination are immediately under the bolt head and
          nut in each case. Line OA shows the VDI 2230 model, with the point A representing
          the limit of its validity. Line OB shows the fulcrum model, with B representing the
          point at which the preload between the flanges at the position of the bolts
          disappears. Thereafter, the bolt load varies as Z(1 þ b=x), i.e. along line BC for
          x=a ¼ 0:7. It may be noted from Figure 7.43 that a value of x=a of 0.8 results in better
          agreement with the test results at high loads, but these are not of interest for design
          purposes.
            Schmidt and Neuper (1997) have proposed a more sophisticated model identified
          as ‘Model C’, which combines aspects of the two models already described and
          gives a bolt load characteristic consisting of the three straight lines OA, AB and BC
          (see Figure 7.43). Clearly this agrees much better with the experimental results, but
          it adds to the complexity of the fatigue load calculation.
            Uniformity of bolt loading around the tower clearly depends on the accuracy of
          the mating flange surfaces. Schmidt, Winterstetter and Kramer (1999) have investi-

