
Page 185 - 15 Dangerously Mad Projects for the Evil Genius
P. 185
162 15 Dangerously Mad Projects for the Evil Genius
wire, we should carry out a quick resistance test to
make sure we have approximately the right number
of turns.
Carefully scrape away a small section of the
enamel from both the lead that we started with and
the wire that we were feeding onto the coil.
Measure the resistance using a multimeter. It
should be somewhere between 3 and 5 —
ideally, 4 .
If the resistance is less than 3 , we need to add
some more turns of wire to the coil. Do not worry
about insulating the wire where you scraped away
the enamel; the rest of the wire is insulated, so you
will not cause a short circuit.
If, on the other hand, the resistance is greater
than 5 , we need to take some turns off the coil
until we bring it under 5 .
When you are happy with the coil, cut the wire,
leaving four inches (100mm) free, and use some
insulating tape to fix the wire in place (Figure 13-5).
Step 3. Build the Frame
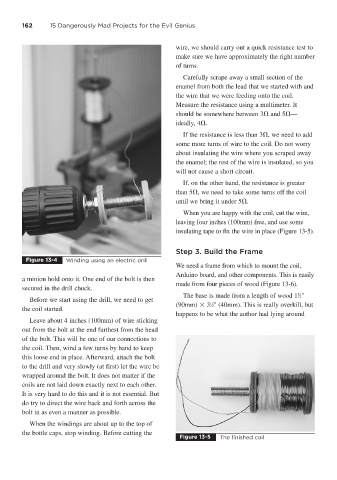
Figure 13-4 Winding using an electric drill
We need a frame from which to mount the coil,
Arduino board, and other components. This is easily
a minion hold onto it. One end of the bolt is then
made from four pieces of wood (Figure 13-6).
secured in the drill chuck.
1
The base is made from a length of wood 1 ⁄2"
Before we start using the drill, we need to get
(90mm) 3 ⁄2" (40mm). This is really overkill, but
1
the coil started.
happens to be what the author had lying around
Leave about 4 inches (100mm) of wire sticking
out from the bolt at the end furthest from the head
of the bolt. This will be one of our connections to
the coil. Then, wind a few turns by hand to keep
this loose end in place. Afterward, attach the bolt
to the drill and very slowly (at first) let the wire be
wrapped around the bolt. It does not matter if the
coils are not laid down exactly next to each other.
It is very hard to do this and it is not essential. But
do try to direct the wire back and forth across the
bolt in as even a manner as possible.
When the windings are about up to the top of
the bottle caps, stop winding. Before cutting the
Figure 13-5 The finished coil