Page 184 - 15 Dangerously Mad Projects for the Evil Genius
P. 184

Chapter 13    ■   Levitation Machine     161


                                                           This sounds difficult, but actually it’s not at all.
                                                           The wire will be wrapped around a large bolt and
                                                           we will use two bottle caps as the end points to
                                                           contain the wire.
                                                             The first step in this is to cut the rims off the
                                                                                                     1
                                                           bottle caps so they are just plastic discs about 1 ⁄2
                                                           inches (35mm) in diameter. We then need to drill
                                                           holes in the center of each disc, the same diameter
                                                           as the bolt shaft.
                                                             Fit one of the washers up against the head of the
                                                           bolt and position the other washer to rest against
                                                           the nut, so that the gap the coil will be wound
                                                                   1
                                                           about is 1 ⁄4 inches (30mm).
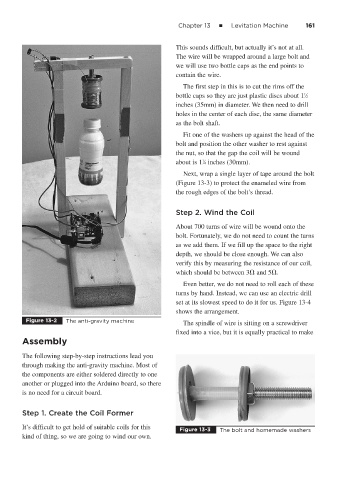
                                                             Next, wrap a single layer of tape around the bolt
                                                           (Figure 13-3) to protect the enameled wire from
                                                           the rough edges of the bolt’s thread.


                                                           Step 2. Wind the Coil

                                                           About 700 turns of wire will be wound onto the
                                                           bolt. Fortunately, we do not need to count the turns
                                                           as we add them. If we fill up the space to the right
                                                           depth, we should be close enough. We can also
                                                           verify this by measuring the resistance of our coil,
                                                           which should be between 3  and 5 .

                                                             Even better, we do not need to roll each of these
                                                           turns by hand. Instead, we can use an electric drill
                                                           set at its slowest speed to do it for us. Figure 13-4
                                                           shows the arrangement.
         Figure 13-2   The anti-gravity machine
                                                             The spindle of wire is sitting on a screwdriver
                                                           fixed into a vice, but it is equally practical to make
        Assembly

        The following step-by-step instructions lead you
        through making the anti-gravity machine. Most of
        the components are either soldered directly to one
        another or plugged into the Arduino board, so there
        is no need for a circuit board.


        Step 1. Create the Coil Former

        It’s difficult to get hold of suitable coils for this
                                                            Figure 13-3  The bolt and homemade washers
        kind of thing, so we are going to wind our own.
   179   180   181   182   183   184   185   186   187   188   189