
Page 186 - 15 Dangerously Mad Projects for the Evil Genius
P. 186
Chapter 13 ■ Levitation Machine 163
drill bit slightly smaller than the screws to prevent
splitting of the wood.
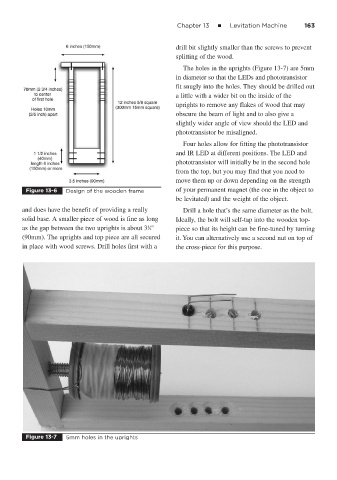
The holes in the uprights (Figure 13-7) are 5mm
in diameter so that the LEDs and phototransistor
fit snugly into the holes. They should be drilled out
a little with a wider bit on the inside of the
uprights to remove any flakes of wood that may
obscure the beam of light and to also give a
slightly wider angle of view should the LED and
phototransistor be misaligned.
Four holes allow for fitting the phototransistor
and IR LED at different positions. The LED and
phototransistor will initially be in the second hole
from the top, but you may find that you need to
move them up or down depending on the strength
Figure 13-6 Design of the wooden frame of your permanent magnet (the one in the object to
be levitated) and the weight of the object.
and does have the benefit of providing a really Drill a hole that’s the same diameter as the bolt.
solid base. A smaller piece of wood is fine as long Ideally, the bolt will self-tap into the wooden top-
1
as the gap between the two uprights is about 3 ⁄2" piece so that its height can be fine-tuned by turning
(90mm). The uprights and top piece are all secured it. You can alternatively use a second nut on top of
in place with wood screws. Drill holes first with a the cross-piece for this purpose.
Figure 13-7 5mm holes in the uprights