
Page 31 - 15 Dangerously Mad Projects for the Evil Genius
P. 31
12 15 Dangerously Mad Projects for the Evil Genius
Before fitting the plastic cover, put some
insulating tape over any bare wires that might
move and touch something they shouldn’t.
The final refinement—done to make the gun
easier to use—is to make a “stop” to prevent the
projectile from falling out of the back of the coil.
This way we can just drop the projectile in from
the front and know that it is in the correct position.
To do this, use a ⁄32-inch (1mm) drill bit to make
1
a tiny hole in the firing tube at the position where
the end of the projectile furthest from the coil
Figure 1-20 The hole for mounting the switch should be placed for best firing. You will have
determined this from your earlier experiments.
Then, put a short length of ⁄8-inch (about 1mm)
3
wire (I used a bit of resistor lead) through the hole
and bend over both ends so it stays in place. You
can see this in Figure 1-23.
An optional refinement to the case design is to
cut some thin Perspex or other flexible plastic (say,
from a large plastic bottle) and bend it over the
wood from one side to the other, fixing it in place
with screws.
Figure 1-21 The switch mounted as a trigger
Simply take a plastic drink bottle and cut off
both ends, then measure out the right length and
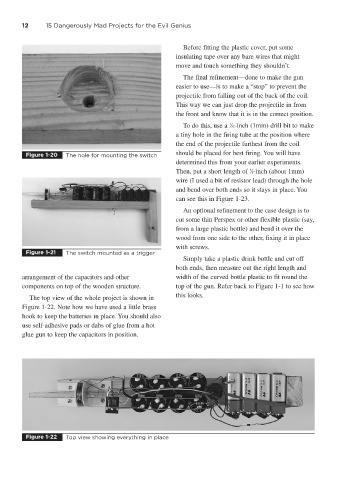
arrangement of the capacitors and other width of the curved bottle plastic to fit round the
components on top of the wooden structure. top of the gun. Refer back to Figure 1-1 to see how
The top view of the whole project is shown in this looks.
Figure 1-22. Note how we have used a little brass
hook to keep the batteries in place. You should also
use self-adhesive pads or dabs of glue from a hot
glue gun to keep the capacitors in position.
Figure 1-22 Top view showing everything in place