
Page 29 - 15 Dangerously Mad Projects for the Evil Genius
P. 29
10 15 Dangerously Mad Projects for the Evil Genius
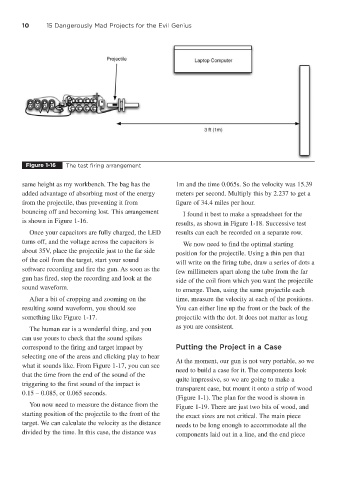
Figure 1-16 The test firing arrangement
same height as my workbench. The bag has the 1m and the time 0.065s. So the velocity was 15.39
added advantage of absorbing most of the energy meters per second. Multiply this by 2.237 to get a
from the projectile, thus preventing it from figure of 34.4 miles per hour.
bouncing off and becoming lost. This arrangement
I found it best to make a spreadsheet for the
is shown in Figure 1-16.
results, as shown in Figure 1-18. Successive test
Once your capacitors are fully charged, the LED results can each be recorded on a separate row.
turns off, and the voltage across the capacitors is
We now need to find the optimal starting
about 35V, place the projectile just to the far side
position for the projectile. Using a thin pen that
of the coil from the target, start your sound
will write on the firing tube, draw a series of dots a
software recording and fire the gun. As soon as the few millimeters apart along the tube from the far
gun has fired, stop the recording and look at the side of the coil from which you want the projectile
sound waveform. to emerge. Then, using the same projectile each
After a bit of cropping and zooming on the time, measure the velocity at each of the positions.
resulting sound waveform, you should see You can either line up the front or the back of the
something like Figure 1-17. projectile with the dot. It does not matter as long
The human ear is a wonderful thing, and you as you are consistent.
can use yours to check that the sound spikes
correspond to the firing and target impact by Putting the Project in a Case
selecting one of the areas and clicking play to hear
At the moment, our gun is not very portable, so we
what it sounds like. From Figure 1-17, you can see
need to build a case for it. The components look
that the time from the end of the sound of the
quite impressive, so we are going to make a
triggering to the first sound of the impact is
transparent case, but mount it onto a strip of wood
0.15 – 0.085, or 0.065 seconds.
(Figure 1-1). The plan for the wood is shown in
You now need to measure the distance from the Figure 1-19. There are just two bits of wood, and
starting position of the projectile to the front of the the exact sizes are not critical. The main piece
target. We can calculate the velocity as the distance needs to be long enough to accommodate all the
divided by the time. In this case, the distance was components laid out in a line, and the end piece