
Page 80 - 15 Dangerously Mad Projects for the Evil Genius
P. 80
Chapter 5 ■ Balloon-Popping Laser Gun 59
The battery is a rechargeable 9V PP3 battery.
There are good reasons for using a rechargeable
battery here. The motor is likely to draw several
amps, the battery will become dead quite quickly,
and it is greener and more economical to recharge
rather than replace.
The expanded packing material is going to be
used to diffuse the light from the laser. Look for
something that will allow light to pass but diffuse
it like frosted glass. We also use this useful
material in Chapters 7 and 10, which focus on a
laser beam alarm and laser voice transmission.
In addition to these components, you will also
need the following tools:
T OOLBO X
■ An electric drill and assorted drill bits
■ Epoxy resin glue or a hot glue gun
■ Soldering equipment
■ Scissors
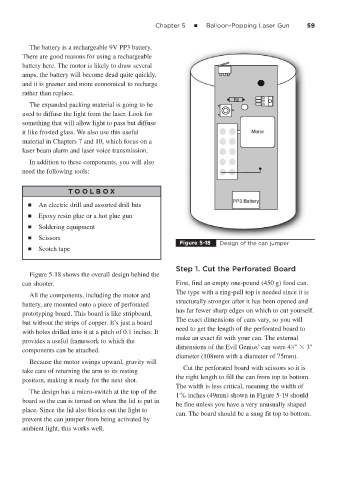
Figure 5-18 Design of the can jumper
■ Scotch tape
Step 1. Cut the Perforated Board
Figure 5-18 shows the overall design behind the
can shooter. First, find an empty one-pound (450 g) food can.
The type with a ring-pull top is needed since it is
All the components, including the motor and
structurally stronger after it has been opened and
battery, are mounted onto a piece of perforated
has far fewer sharp edges on which to cut yourself.
prototyping board. This board is like stripboard,
The exact dimensions of cans vary, so you will
but without the strips of copper. It’s just a board
need to get the length of the perforated board to
with holes drilled into it at a pitch of 0.1 inches. It
make an exact fit with your can. The external
provides a useful framework to which the
dimensions of the Evil Genius’ can were 4 ⁄4" 3"
1
components can be attached.
diameter (108mm with a diameter of 75mm).
Because the motor swings upward, gravity will
Cut the perforated board with scissors so it is
take care of returning the arm to its resting
the right length to fill the can from top to bottom.
position, making it ready for the next shot.
The width is less critical, meaning the width of
The design has a micro-switch at the top of the
1 ⁄16 inches (49mm) shown in Figure 5-19 should
15
board so the can is turned on when the lid is put in
be fine unless you have a very unusually shaped
place. Since the lid also blocks out the light to
can. The board should be a snug fit top to bottom.
prevent the can jumper from being activated by
ambient light, this works well.