Page 274 - Analysis and Design of Machine Elements
P. 274
Analysis and Design of Machine Elements
                   252
                        Steps          Computation                              Results    Units
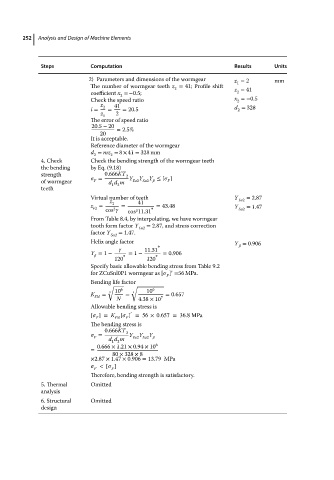
                                      2) Parameters and dimensions of the wormgear  z = 2  mm
                                                                                 1
                                       The number of wormgear teeth z = 41; Profile shift  z = 41
                                                               2
                                       coefficient x =−0.5;                        2
                                               2
                                       Check the speed ratio                    x =−0.5
                                                                                 2
                                         z   41
                                       i =  2  =  = 20.5                        d = 328
                                                                                 2
                                         z 1  2
                                       The error of speed ratio
                                       20.5 − 20
                                              = 2.5%
                                         20
                                       It is acceptable.
                                       Reference diameter of the wormgear
                                       d = mz = 8 × 41 = 328 mm
                                       2
                                            2
                        4. Check       Check the bending strength of the wormgear teeth
                        the bending    by Eq. (9.18)
                        strength          =  0.666KT  2  Y  Y  Y ≤ [   ]
                        of wormgear    F    d d m  Fa2 Sa2     F
                                             1 2
                        teeth
                                       Virtual number of teeth                  Y  = 2.87
                                            z       41                           Fa2
                                       z =   2  =       ∘  = 43.48              Y  = 1.47
                                       v2
                                             3
                                           cos     cos 11.31                     Sa2
                                                   3
                                       From Table 8.4, by interpolating, we have wormgear
                                       tooth form factor Y  = 2.87, and stress correction
                                                    Fa2
                                       factor Y  Sa2  = 1.47.

                                       Helix angle factor                       Y = 0.906
                                                          ∘
                                                      11.31
                                       Y = 1 −   = 1 −     = 0.906
                                                ∘        ∘
                                             120       120
                                       Specify basic allowable bending stress from Table 9.2
                                       for ZCuSnl0P1 wormgear as [   ] =56 MPa.
                                                              ′
                                                            F
                                       Bending life factor
                                           √      √
                                            9 10 6     10 6
                                       K  =      =  9       = 0.657
                                        FN    N     4.38 × 10 7
                                       Allowable bending stress is
                                                  ′
                                       [   ]= K [   ] =56 × 0.657 = 36.8MPa
                                        F    FN  F
                                       The bending stress is
                                           0.666KT 2
                                                       Y
                                          =       Y Fa2 Sa2
                                                    Y
                                       F
                                            d d m
                                             1 2
                                        0.666 × 1.21 × 0.94 × 10 6
                                       =
                                             80 × 328 × 8
                                       ×2.87 × 1.47 × 0.906 = 13.79 MPa
                                          < [   ]
                                        F    F
                                       Therefore, bending strength is satisfactory.
                        5. Thermal     Omitted
                        analysis
                        6. Structural  Omitted
                        design

