Page 262 - Biaxial Multiaxial Fatigue and Fracture
P. 262
246                              M. END0

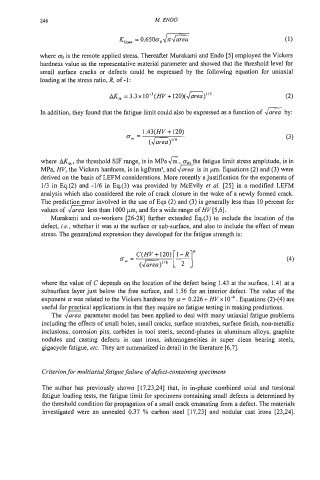
                                   K,,  = 0.650a0d=

            where a0 is the remote applied stress. Thereafter Murakami and Endo [5] employed the Vickers
            hardness value as the representative material parameter and showed that the threshold level for
            small  surface  cracks  or  defects  could  be  expressed  by  the  following  equation  for  uniaxial
            loading at the stress ratio, R, of -1 :
                                AK~,, = 3.3x10⁻³(~v+120)(Jarea)1/3                (2)

             In addition, they found that the fatigue limit could also be expressed as a function of 6
                                                                                  by:

                                          1.43(HY + 120)
                                     6, =                                         (3)


             where AK,,, , the threshold SIF range, is in MPaG, aw,the fatigue limit stress amplitude, is in
             MPa, HV, the Vickers hardness, is in kgf/mmz, and 6 is in pm. Equations (2) and (3) were
             derived on the basis of LEFM considerations. More recently a justification for the exponents of
             1/3 in  Eq.(2)  and -1/6 in Eq.(3)  was provided by  McEvily et  al.  [25] in a modified LEFM
             analysis which also considered the role of crack closure in the wake of a newly formed crack.
             The prediction error involved in the use of Eqs (2) and (3) is generally less than 10 percent for
             values of 6 less than 1000 pm, and for a wide range of HV [5,6].
                Murakami and  co-workers  [26-281 further extended Eq.(3) to include the location of the
             defect, i.e., whether it was at the surface or sub-surface, and also to include the effect of mean
             stress. The generalized expression they developed for the fatigue strength is:

                                        C(W+120) I-R  =
                                   ow =                                           (4)
                                         (Jarea)"6  [TI


             where the value of C depends on the location of the defect being  1.43 at the surface, 1.41 at a
             subsurface layer just below the free surface, and  1.56 for an interior defect. The value of the
             exponent a was related to the Vickers hardness by a = 0.226 + HV x 1 O4 . Equations (2)-(4) are
             useful for practical applications in that they require no fatigue testing in making predictions.
                The & parameter model has been applied to deal with many uniaxial fatigue problems
             including the effects of small holes, small cracks, surface scratches, surface finish, non-metallic
             inclusions, corrosion pits, carbides in tool steels, second-phases in  aluminum alloys, graphite
             nodules  and  casting  defects  in  cast  irons,  inhomogeneities  in  super  clean  bearing  steels,
             gigacycle fatigue, etc. They are summarized in detail in the literature [6,7].


             Criterion for multiaxial fatigue failure of defect-containing specimens

             The  author  has  previously  shown  [17,23,24] that,  in  in-phase combined  axial  and  torsional
             fatigue loading tests, the fatigue limit for specimens containing small defects is determined by
             the threshold condition for propagation of a small crack emanating from a defect. The materials
             investigated were  an annealed  0.37 % carbon  steel  [17,23] and  nodular  cast  irons  [23,24].

