
Page 97 - Build a Remote Controlled Robot
P. 97
64
CHAPTER FOUR
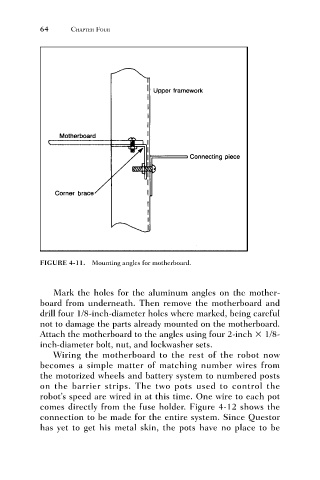
FIGURE 4-11. Mounting angles for motherboard.
Mark the holes for the aluminum angles on the mother-
board from underneath. Then remove the motherboard and
drill four 1/8-inch-diameter holes where marked, being careful
not to damage the parts already mounted on the motherboard.
Attach the motherboard to the angles using four 2-inch 1/8-
inch-diameter bolt, nut, and lockwasher sets.
Wiring the motherboard to the rest of the robot now
becomes a simple matter of matching number wires from
the motorized wheels and battery system to numbered posts
on the barrier strips. The two pots used to control the
robot’s speed are wired in at this time. One wire to each pot
comes directly from the fuse holder. Figure 4-12 shows the
connection to be made for the entire system. Since Questor
has yet to get his metal skin, the pots have no place to be