
Page 93 - Build a Remote Controlled Robot
P. 93
60
CHAPTER FOUR
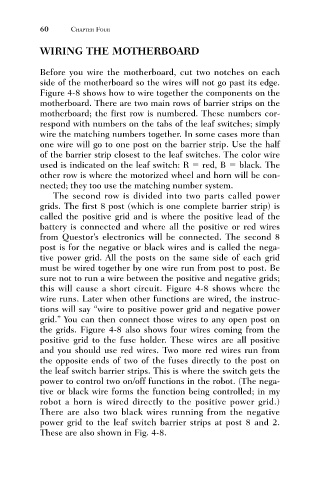
WIRING THE MOTHERBOARD
Before you wire the motherboard, cut two notches on each
side of the motherboard so the wires will not go past its edge.
Figure 4-8 shows how to wire together the components on the
motherboard. There are two main rows of barrier strips on the
motherboard; the first row is numbered. These numbers cor-
respond with numbers on the tabs of the leaf switches; simply
wire the matching numbers together. In some cases more than
one wire will go to one post on the barrier strip. Use the half
of the barrier strip closest to the leaf switches. The color wire
used is indicated on the leaf switch: R red, B black. The
other row is where the motorized wheel and horn will be con-
nected; they too use the matching number system.
The second row is divided into two parts called power
grids. The first 8 post (which is one complete barrier strip) is
called the positive grid and is where the positive lead of the
battery is connected and where all the positive or red wires
from Questor’s electronics will be connected. The second 8
post is for the negative or black wires and is called the nega-
tive power grid. All the posts on the same side of each grid
must be wired together by one wire run from post to post. Be
sure not to run a wire between the positive and negative grids;
this will cause a short circuit. Figure 4-8 shows where the
wire runs. Later when other functions are wired, the instruc-
tions will say “wire to positive power grid and negative power
grid.” You can then connect those wires to any open post on
the grids. Figure 4-8 also shows four wires coming from the
positive grid to the fuse holder. These wires are all positive
and you should use red wires. Two more red wires run from
the opposite ends of two of the fuses directly to the post on
the leaf switch barrier strips. This is where the switch gets the
power to control two on/off functions in the robot. (The nega-
tive or black wire forms the function being controlled; in my
robot a horn is wired directly to the positive power grid.)
There are also two black wires running from the negative
power grid to the leaf switch barrier strips at post 8 and 2.
These are also shown in Fig. 4-8.