
Page 279 - Enhancing CAD Drawings with Photoshop
P. 279
4386.book Page 263 Monday, November 15, 2004 3:27 PM
ILLUSTRATING A 3D MODEL 263
NOTE Area shadows are softer the further they are from the casting edge.
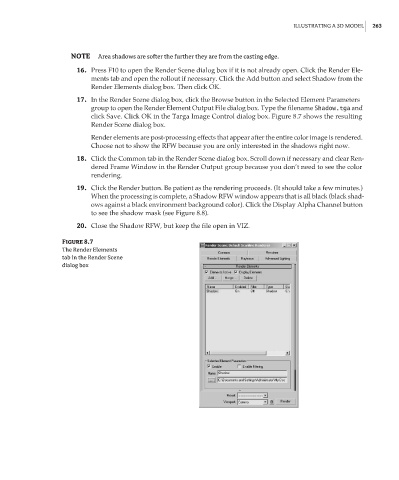
16. Press F10 to open the Render Scene dialog box if it is not already open. Click the Render Ele-
ments tab and open the rollout if necessary. Click the Add button and select Shadow from the
Render Elements dialog box. Then click OK.
17. In the Render Scene dialog box, click the Browse button in the Selected Element Parameters
group to open the Render Element Output File dialog box. Type the filename Shadow.tga and
click Save. Click OK in the Targa Image Control dialog box. Figure 8.7 shows the resulting
Render Scene dialog box.
Render elements are post-processing effects that appear after the entire color image is rendered.
Choose not to show the RFW because you are only interested in the shadows right now.
18. Click the Common tab in the Render Scene dialog box. Scroll down if necessary and clear Ren-
dered Frame Window in the Render Output group because you don’t need to see the color
rendering.
19. Click the Render button. Be patient as the rendering proceeds. (It should take a few minutes.)
When the processing is complete, a Shadow RFW window appears that is all black (black shad-
ows against a black environment background color). Click the Display Alpha Channel button
to see the shadow mask (see Figure 8.8).
20. Close the Shadow RFW, but keep the file open in VIZ.
Figure 8.7
The Render Elements
tab in the Render Scene
dialog box