
Page 30 - Enhancing CAD Drawings with Photoshop
P. 30
4386.book Page 13 Monday, November 15, 2004 3:27 PM
UNDERSTANDING MODES, BITS, AND CHANNELS 13
At the top of the table, notice that 2 to the first power yields two possible values: 1 or 0. Bitmap
images have pixels that fall into this category because there are only two possibilities for their pixels:
black or white.
You can visualize grayscale images as a composite of 8 bitmaps laid on top of each other in imag-
inary transparent planes called bit planes. When 8-bit planes are overlaid, there are 256 possibilities for
each pixel in the resulting image (2 to the eighth power). Grayscale images are known as 8-bit images
because 8 is their bit depth, or number of overlaid bit planes.
NOTE Images with greater bit depth require more memory and storage space because they contain
more information.
Color Images
Color is a complex subject that you will learn more about in Chapter 2, “Working with Color.” For
now, let’s start by taking a look at how color images are stored in computers. Color is represented dig-
itally by combining a few basic or elementary colors to obtain others. For example, in the RGB color
mode, there are three component colors: red, green, and blue. A large range of color can be produced
by combining the elementary or component colors in differing amounts. Color is stored in channels
that correspond to each of the components. Let’s see how this works with an example.
1. Open the file StreetRGB.psd from the CD.
2. Choose Edit Preferences Display & Cursors to open the Preferences dialog box, as shown
in Figure 1.14.
3. Check Color Channels In Color in the Display group, and then click OK. This setting will help
you initially visualize the way channels work.
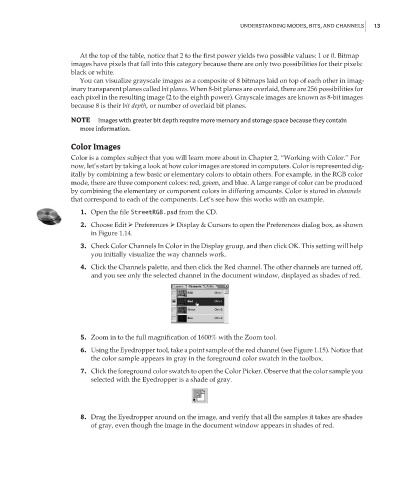
4. Click the Channels palette, and then click the Red channel. The other channels are turned off,
and you see only the selected channel in the document window, displayed as shades of red.
5. Zoom in to the full magnification of 1600% with the Zoom tool.
6. Using the Eyedropper tool, take a point sample of the red channel (see Figure 1.15). Notice that
the color sample appears in gray in the foreground color swatch in the toolbox.
7. Click the foreground color swatch to open the Color Picker. Observe that the color sample you
selected with the Eyedropper is a shade of gray.
8. Drag the Eyedropper around on the image, and verify that all the samples it takes are shades
of gray, even though the image in the document window appears in shades of red.