
Page 81 - Excel Workbook for Dummies
P. 81
08_798452 ch04.qxp 3/13/06 7:36 PM Page 64
64 Part I: Creating Spreadsheets
This time Excel inserts Part 103 data entries at the top of the table without any
warnings.
15. Use drag-and-drop with the Shift key to complete the reordering of the rows of
data in the copy of the Production Schedule table so that cell range B20:K20
contains the Part 102, B21:K21 the Part 101 data, and B22:K22 the Part 100 data.
16. Relocate the two Production Schedule tables that now exist on the Schedule
Sheet up so that the original table now in cell range B8: K14 occupies the cell
range A1:J7 and the copy you made in cell range B17:K23 occupies the range
A10:J16.
17. Select cell A1, and then save your work in a new workbook in your Chapter 4
folder in the My Practice Spreadsheets folder with the filename Solved4-9.xls.
Close this workbook.
Using Notes in the Spreadsheet
Excel makes it easy to attach notes to the cells of a spreadsheet. You can use these
notes (officially called comments in the program) to remind yourself or your cowork-
ers of changes that need to be made in the spreadsheet or data that needs to be
reviewed and verified.
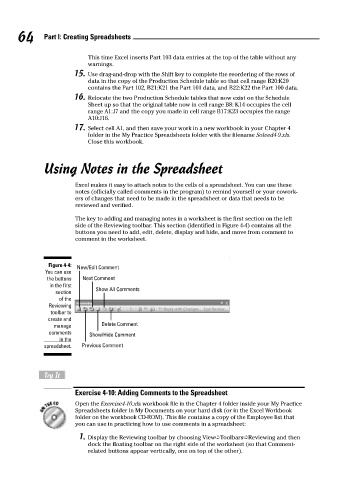
The key to adding and managing notes in a worksheet is the first section on the left
side of the Reviewing toolbar. This section (identified in Figure 4-4) contains all the
buttons you need to add, edit, delete, display and hide, and move from comment to
comment in the worksheet.
Figure 4-4: New/Edit Comment
You can use
the buttons Next Comment
in the first
section Show All Comments
of the
Reviewing
toolbar to
create and
manage Delete Comment
comments Show/Hide Comment
in the
spreadsheet. Previous Comment
Try It
Exercise 4-10: Adding Comments to the Spreadsheet
Open the Exercise4-10.xls workbook file in the Chapter 4 folder inside your My Practice
Spreadsheets folder in My Documents on your hard disk (or in the Excel Workbook
folder on the workbook CD-ROM). This file contains a copy of the Employee list that
you can use in practicing how to use comments in a spreadsheet:
1. Display the Reviewing toolbar by choosing View➪Toolbars➪Reviewing and then
dock the floating toolbar on the right side of the worksheet (so that Comment-
related buttons appear vertically, one on top of the other).