Page 326 - Handbook of Structural Steel Connection Design and Details
P. 326
Partially Restrained Connections

                                                      Partially Restrained Connections  311

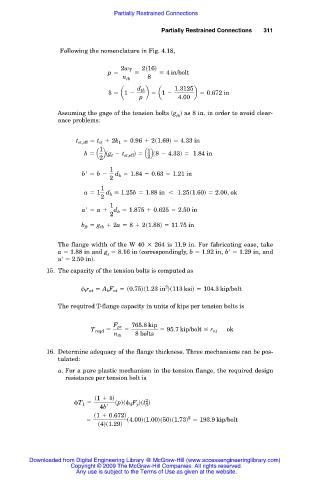
                          Following the nomenclature in Fig. 4.18,

                                                 2s16d
                                           2w T
                                       p 5     5     5 4 in/bolt
                                           n tb   8
                                                          1.3125
                                               d th
                                         5 a1 2   b 5 a1 2     b 5 0.672 in
                                                p          4.00
                         Assuming the gage of the tension bolts (g ) as 8 in. in order to avoid clear-
                                                          tb
                         ance problems:

                              t st,eff 5 t st 1 2k 1 5 0.96 1 2s1.69d 5 4.33 in
                                     1            1
                                   b 5 Q Rsg t 2 t st,eff d 5 Q Rs8 2 4.33d 5  1.84 in
                                     2            2
                                        1
                                b  5 b 2  d b 5 1.84 2 0.63 5 1.21 in
                                        2
                                     1
                                 a 5 1  d b # 1.25b 5 1.88 in  ,  1.25s1.60d 5 2.00, ok
                                     2
                                        1
                                a  5 a 1 d b 5 1.875 1 0.625 5 2.50 in
                                        2
                                b ft 5 g tb 1 2a 5 8 1 2s1.88d 5 11.75 in


                         The flange width of the W 40   264 is 11.9 in. For fabricating ease, take
                         a   1.88 in and g   8.16 in (correspondingly, b   1.92 in, b   1.29 in, and
                                       t
                         a   2.50 in).
                      15. The capacity of the tension bolts is computed as

                                                       2
                                  t r nt 5 A b F nt 5 s0.75ds1.23 in ds113 ksid 5 104.3 kip/bolt
                         The required T-flange capacity in units of kips per tension bolts is

                                              765.8 kip
                                         F pr
                                  T reqd 5  5         5 95.7 kip/bolt # r nt     ok
                                         n tb  8 bolts
                      16. Determine adequacy of the flange thickness. Three mechanisms can be pos-
                         tulated:
                          a. For a pure plastic mechanism in the tension flange, the required design
                           resistance per tension bolt is

                                    s1 1  d
                                                  2
                               T 1 5     spds  d F y dst ft d
                                     4b
                                   s1 1 0.672d
                                                             2
                                     5       s4.00ds1.00ds50ds1.73d 5 193.9 kip/bolt
                                    s4ds1.29d


                 Downloaded from Digital Engineering Library @ McGraw-Hill (www.accessengineeringlibrary.com)
                             Copyright © 2009 The McGraw-Hill Companies. All rights reserved.
                              Any use is subject to the Terms of Use as given at the website.

