
Page 96 - Make Your Own PCBs with EAGLE from Schematic Designs to Finished Boards
P. 96
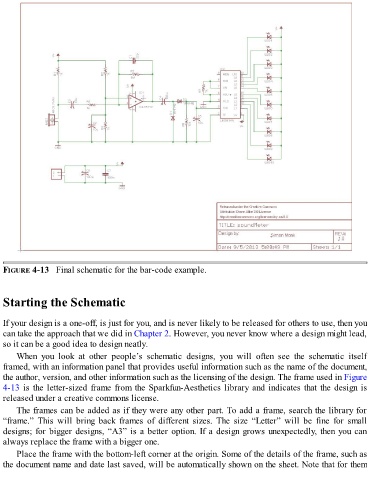
FIGURE 4-13   Final schematic for the bar-code example.


  Starting the Schematic


  If your design is a one-off, is just for you, and is never likely to be released for others to use, then you
  can take the approach that we did in Chapter 2. However, you never know where a design might lead,
  so it can be a good idea to design neatly.

      When  you  look  at  other  people’s  schematic  designs,  you  will  often  see  the  schematic  itself
  framed, with an information panel that provides useful information such as the name of the document,
  the author, version, and other information such as the licensing of the design. The frame used in Figure
  4-13 is the letter-sized frame from the Sparkfun-Aesthetics library and indicates that the design is
  released under a creative commons license.

      The frames can be added as if they were any other part. To add a frame, search the library for
  “frame.”  This  will  bring  back  frames  of  different  sizes.  The  size  “Letter”  will  be  fine  for  small
  designs; for bigger designs, “A3” is a better option. If a design grows unexpectedly, then you can
  always replace the frame with a bigger one.

      Place the frame with the bottom-left corner at the origin. Some of the details of the frame, such as
  the document name and date last saved, will be automatically shown on the sheet. Note that for them