
Page 290 - Manufacturing Engineering and Technology - Kalpakjian, Serope : Schmid, Steven R.
P. 290
Section 11.2 Expendable-mold, Permanent-pattern Casting Processes 2
In the plaster-molding process, the mold is made of plaster of paris (gypsum or
calcium sulfate) with the addition of tale and silica flour to improve strength and to
control the time required for the plaster to set. These components are mixed with
water, and the resulting slurry is poured over the pattern. After the plaster sets
(usually within 15 minutes), it is removed, and the mold is dried at a temperature
range of 120° to 260°C. Higher drying temperatures may be used, depending on the
type of plaster. The mold halves are assembled to form the mold cavity and are pre-
heated to about 120°C. The molten metal is then poured into the mold.
Because plaster molds have very low permeability, gases evolved during solidi-
fication of the metal cannot escape. Consequently, the molten metal is poured either
in a vacuum or under pressure. Mold permeability can be increased substantially by
the Antioch process, in which the molds are dehydrated in an autoclat/e (pressurized
oven) for 6 to 12 hours and then rehydrated in air for 14 hours. Another method of
increasing the permeability of the mold is to use foamed plaster containing trapped
air bubbles.
Patterns for plaster molding generally are made of materials such as aluminum
alloys, thermosetting plastics, brass, or zinc alloys. Wood patterns are not suitable for
making a large number of molds, because they are repeatedly in contact with
the water-based plaster slurry and warp or degrade quickly. Since there is a limit to the
maximum temperature that the plaster mold can withstand (generally about 1200°C),
plaster-mold casting is used only for aluminum, magnesium, zinc, and some copper-
based alloys. The castings have a good surface finish with fine details. Because plaster
molds have lower thermal conductivity than other mold materials, the castings cool
slowly, and thus a more uniform grain structure is obtained with less warpage. The
wall thickness of the cast parts can be 1 to 2.5 mm.
I l.2.4 Ceramic-mold Casting
The ceramic-mold casting process (also called cope-and-drag investment casting) is
similar to the plaster-mold process, except that it uses refractory mold materials
suitable for high-temperature applications. Typical parts made are impellers, cutters
for machining operations, dies for metalworking, and molds for making plastic and
rubber Components. Parts weighing as much as 700 kg have been cast by this
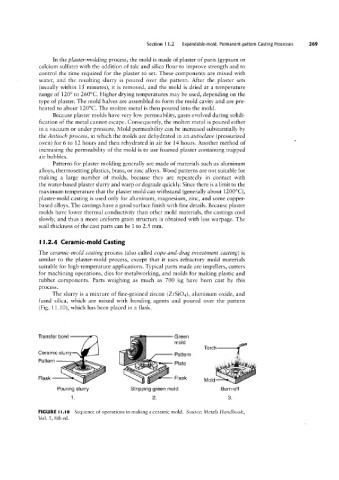
Pattern Green Mold
process.
The slurry is a mixture of fine-grained zircon (ZrSiO4), aluminum oxide, and
fused silica, which are mixed with bonding agents and poured over the pattern
Transfer bowl I
(Fig. 11.10), which has been placed in a flask.
N
Ceramic slurry A
F'HSl<
mold
pattern
My
P' t
Flask
Pouring slurry Stripping green mold Burn-off
1. 2. 3.
FIGURE l.l0 Sequence of operations in making a ceramic mold. Source: Metals Handbook,
I
Vol. 5, 8th ed.