Page 91 - 04. Subyek Engineering Materials - Manufacturing, Engineering and Technology SI 6th Edition - Serope Kalpakjian, Stephen Schmid (2009)
P. 91

Chapter 2  Mechanical Behavior, Testing, and Manufacturing Properties of Materials
                              carbide ball                                               =l`*l
                                                       Shape of indentation
                       Test       lndenter         Side view       Top view  Load, P     Hardness number
                                                                                           HV -
                                                   *l l*
                                                                     G
                                                                                                 2P
                               10-mm steel
                                                                               500 K9
                                                                              1500 kg
                      Brinell  or tungsten-                        »l dl+     3000 kg  HB  l"D)(D °VD2 ' dz)
                              Diamond pyramid ~( >                   L        -   k
                                                     136°
                      Vickers                                                1 120  9
                                                                       A
                                                                      b
                      Knoop   Diamond pyramid      /_/b :_-7T';1___+_l      25 9-5 K9       HK = blip
                                                              I    '__ L ,l
                                                   b/r = 4.oo
                      Rockwell
                      A                                                         eo kg   HRA
                      C        Diamond cone         ___    _                   150 kg   HRC    100 - 500t
                               1.6-mm diameter
                      D                                  t fmm                 1oo kg   HRD

                      B                                .                       100 kg   HFlB
                      F                                   _                     60 kg   HRF
                      G        steel ban                tfmm         ` `ii`    150 kg   HRG    130 ‘ 500f

                      E        3.2-mm diameter                                 100 kg   HRE
                               steel ball


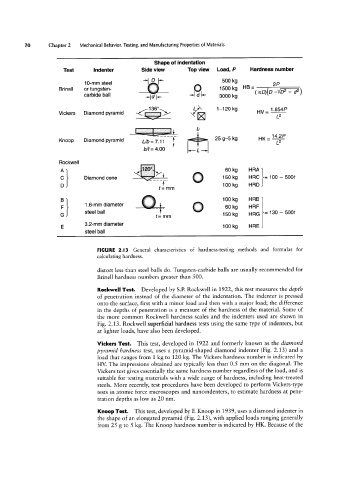
                                   FIGURE 2.13  General characteristics of hardness-testing methods and formulas for
                                   calculating hardness.

                                   distort less than steel balls do. Tungsten-carbide balls are usually recommended for
                                   Brinell hardness numbers greater than 500.

                                   Rockwell Test.  Developed by S.P. Rockwell in 1922, this test measures the depth
                                   of penetration instead of the diameter of the indentation. The indenter is pressed
                                   onto the surface, first with a minor load and then with a major load; the difference
                                   in the depths of penetration is a measure of the hardness of the material. Some of
                                   the more common Rockwell hardness scales and the indenters used are shown in
                                   Fig. 2.13. Rockwell superficial hardness tests using the same type of indenters, but
                                   at lighter loads, have also been developed.
                                   Vickers Test.  This test, developed in 1922 and formerly known as the diamond
                                   pyramid hardness test, uses a pyramid-shaped diamond indenter (Fig. 2.13) and a
                                   load that ranges from 1 kg to 120 kg. The Vickers hardness number is indicated by
                                   HV. The impressions obtained are typically less than 0.5 mm on the diagonal. The
                                   Vickers test gives essentially the same hardness number regardless of the load, and is
                                   suitable for testing materials with a wide range of hardness, including heat-treated
                                   steels. More recently, test procedures have been developed to perform Vickers-type
                                   tests in atomic force microscopes and nanoindenters, to estimate hardness at pene-
                                   tration depths as low as 20 nm.
                                   Knoop Test.  This test, developed by F. Knoop in 1939, uses a diamond indenter in
                                   the shape of an elongated pyramid (Fig. 2.13), with applied loads ranging generally
                                   from 25 g to 5 kg. The Knoop hardness number is indicated by HK. Because of the
   86   87   88   89   90   91   92   93   94   95   96