
Page 234 - Mastering SolidWorks
P. 234
|
tutorial: eDitinG anD coPYinG 205
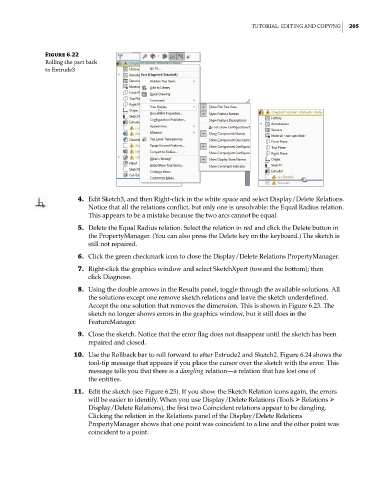
Figure 6.22
rolling the part back
to extrude3
4. Edit Sketch3, and then Right-click in the white space and select Display/Delete Relations.
Notice that all the relations conflict, but only one is unsolvable: the Equal Radius relation.
This appears to be a mistake because the two arcs cannot be equal.
5. Delete the Equal Radius relation. Select the relation in red and click the Delete button in
the PropertyManager. (You can also press the Delete key on the keyboard.) The sketch is
still not repaired.
6. Click the green checkmark icon to close the Display/Delete Relations PropertyManager.
7. Right-click the graphics window and select SketchXpert (toward the bottom); then
click Diagnose.
8. Using the double arrows in the Results panel, toggle through the available solutions. All
the solutions except one remove sketch relations and leave the sketch underdefined.
Accept the one solution that removes the dimension. This is shown in Figure 6.23. The
sketch no longer shows errors in the graphics window, but it still does in the
FeatureManager.
9. Close the sketch. Notice that the error flag does not disappear until the sketch has been
repaired and closed.
10. Use the Rollback bar to roll forward to after Extrude2 and Sketch2. Figure 6.24 shows the
tool-tip message that appears if you place the cursor over the sketch with the error. This
message tells you that there is a dangling relation—a relation that has lost one of
the entities.
11. Edit the sketch (see Figure 6.25). If you show the Sketch Relation icons again, the errors
will be easier to identify. When you use Display/Delete Relations (Tools ➢ Relations ➢
Display/Delete Relations), the first two Coincident relations appear to be dangling.
Clicking the relation in the Relations panel of the Display/Delete Relations
PropertyManager shows that one point was coincident to a line and the other point was
coincident to a point.