
Page 300 - Mastering SolidWorks
P. 300
|
272 CHAPTER 8 Selecting Secondary FeatureS
The Wrap feature has three main options:
◆ Emboss
◆ Deboss
◆ Scribe
Wrap can be placed on analytical (cylindrical, conical, and the like) or complex spline surfaces
(lofts, sweeps, etc.).
Using Scribe
Scribe is the simplest of the options to explain, and understanding it can help you understand the
other options. Scribe creates a split line–like an edge on the face.
Several requirements must be met in order to make a wrap feature work:
◆ The face must be a cylindrical or conical face.
◆ The loop must be a closed-loop or nested-closed-loop 2D sketch.
◆ The sketch must be on a plane that is either tangent to or parallel to another plane that is
tangent to the face.
◆ Wrap supports wrapping onto multiple faces.
◆ The wrap should not be self-intersecting when it wraps around the part. (Self-intersection
will not cause the feature to fail, but on the other types, Emboss and Deboss, it may
produce unexpected results.)
Scribes can be created on solid or surface faces. Scribed surfaces are frequently thickened to
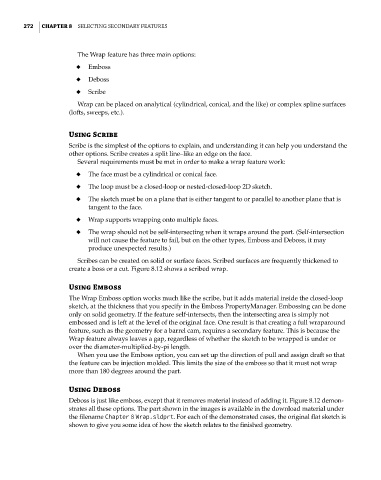
create a boss or a cut. Figure 8.12 shows a scribed wrap.
Using Emboss
The Wrap Emboss option works much like the scribe, but it adds material inside the closed-loop
sketch, at the thickness that you specify in the Emboss PropertyManager. Embossing can be done
only on solid geometry. If the feature self-intersects, then the intersecting area is simply not
embossed and is left at the level of the original face. One result is that creating a full wraparound
feature, such as the geometry for a barrel cam, requires a secondary feature. This is because the
Wrap feature always leaves a gap, regardless of whether the sketch to be wrapped is under or
over the diameter-multiplied-by-pi length.
When you use the Emboss option, you can set up the direction of pull and assign draft so that
the feature can be injection molded. This limits the size of the emboss so that it must not wrap
more than 180 degrees around the part.
Using Deboss
Deboss is just like emboss, except that it removes material instead of adding it. Figure 8.12 demon-
strates all these options. The part shown in the images is available in the download material under
the filename Chapter 8 Wrap.sldprt. For each of the demonstrated cases, the original flat sketch is
shown to give you some idea of how the sketch relates to the finished geometry.