Page 229 - Mechanical Engineer's Data Handbook
P. 229
MANUFACTURING  TECHNOLOGY                                                         217

         Types of .fit                               5.13.2  Selected Fits
         The fit describes the manner in  which  two parts go   BS 4500 ‘Selected Fits’ Gives a much smaller range of
         together. A  ‘clearance fit’ means  that  the  shaft will   fits, the hole tolerance is denoted by the letter H and
         always be smaller than the hole. An  ‘interference fit’   the  shaft  by  a  lower-case  letter  (see  table).  For
         means that the shaft will always be larger than the hole   conventionally manufactured parts, the five fits given
         and a fitting force will be necessary. A ‘transition fit’   are usually sufficient (see table).
         means that there may be either clearance or interfer-
         ence.                                       selected fits (Bs 4500)
         Tolerance                                   Hole    H7  H8  H9  H11

         BS 4500 gives  18 ‘tolerance grades’ numbered ITO1,   Shaft   cll d10  e9  fl g6  h6  k6  n6  p6  s6
         ITO,  IT1,  IT2,  up  to  IT16.  The  actual  tolerance
         depends  on  the  size  of  the  component  (see  table
         below).


         Reduced range of fits for conventionally manufactured prts
         _______~  ~~
         Type of  fit       Shaft tolerance    Hole tolerance     Description of  fit

         Clearance          fl                 H8                 Running
         Clearance          g6                 H7                 Sliding
         Transition         k6                 H7                 Keying
         Interference       P6                 H7                 Press
         Interference       s6                 H7                 Push or shrink


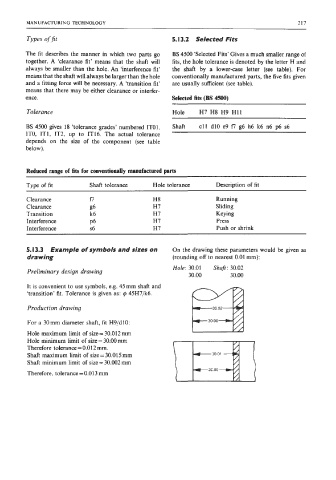
         5.13.3   Example of symbols and sizes on    On the drawing these parameters would  be given  as
         drawing                                     (rounding off  to nearest 0.01 mm):
                                                     Hole: 30.01   Shaft: 30.02
         Preliminary design drawing
                                                          30.00       30.00
         It is convenient to use symbols, e.g. 45 mm shaft and
         ‘transition’ fit. Tolerance is given as: 4 45H7/k6.

         Production  drawing

         For a 30mm diameter shaft, fit H9/d10:
         Hole maximum limit of  size= 30.012 mm
         Hole minimum limit of  size  = 30.00 mm
         Therefore tolerance = 0.012 mm.
         Shaft maximum limit of  size  = 30.015 mm
         Shaft minimum limit of  size = 30.002 mm

         Therefore, tolerance = 0.01 3 mm

