
Page 440 - Robot Builder's Bonanza
P. 440
ANATOMY OF A SOLDERLESS BREADBOARD 409
Stranded conductor wire, which won’t work reliably, even if you twist the strands.
Larger than 20- gauge wire or fat component leads.
Smaller than 26- gauge wire or really skinny component leads (the electrical contact will
be iffy, at best).
High- voltage sources of any kind— these include wires from an AC wall socket or any
circuit that uses high voltage. Solderless breadboards are for low- voltage DC circuits
only.
CONNECTING WIRES FOR YOUR BREADBOARD
No solderless breadboard is complete without wires, but you can’t use just any wire. The best
wire for solderless breadboards is:
• 22- gauge
• Solid conductor
• Plastic insulated
You want wires of different lengths, with about 1/2″ of the insulation stripped off each end.
These jumper wires are available premade, or you can make them yourself. I prefer the pre-
made kind.
If you decide to make your own set of breadboard wires, look for wire spool assortments
with different colors. For starters, cut the wires into the following lengths:
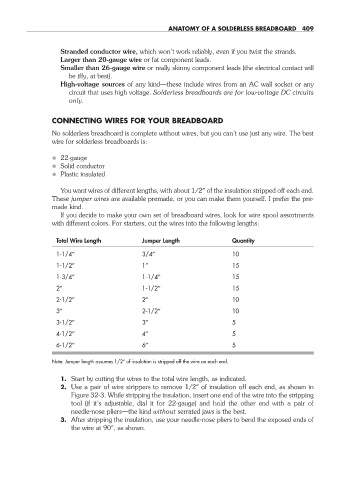
Total Wire Length Jumper Length Quantity
1- 1/4″ 3/4″ 10
1- 1/2″ 1″ 15
1- 3/4″ 1-1/4″ 15
2″ 1-1/2″ 15
2- 1/2″ 2″ 10
3″ 2-1/2″ 10
3- 1/2″ 3″ 5
4- 1/2″ 4″ 5
6- 1/2″ 6″ 5
Note: Jumper length assumes 1/2″ of insulation is stripped off the wire on each end.
1. Start by cutting the wires to the total wire length, as indicated.
2. Use a pair of wire strippers to remove 1/2″ of insulation off each end, as shown in
Figure 32- 3. While stripping the insulation, insert one end of the wire into the stripping
tool (if it’s adjustable, dial it for 22- gauge) and hold the other end with a pair of
needle- nose pliers— the kind without serrated jaws is the best.
3. After stripping the insulation, use your needle- nose pliers to bend the exposed ends of
the wire at 90°, as shown.
32-chapter-32.indd 409 4/21/11 11:56 AM