
Page 442 - Robot Builder's Bonanza
P. 442
MAKING LONG- LASTING SOLDERLESS CIRCUITS 411
5 volts
1 1 5 5 1 1 1 5 5 1 1 1 5 5 1
A A A A A A
B B B B B B
C C C C C C
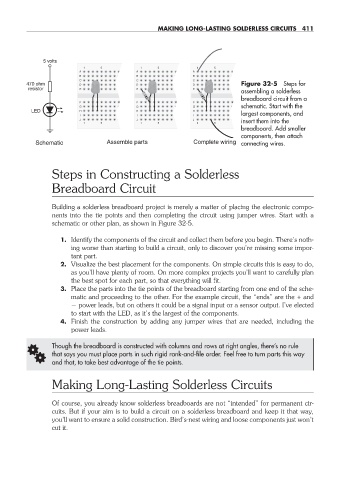
470 ohm D D D D D D Figure 32- 5 Steps for
resistor E E E E E E
assembling a solderless
breadboard circuit from a
F F F F F F
G G G G G G schematic. Start with the
LED H H H H H H
I I I I I I largest components, and
J J J J J J insert them into the
1 1 5 5 1 1 1 5 5 1 1 1 5 5 1
breadboard. Add smaller
components, then attach
Schematic Assemble parts Complete wiring connecting wires.
Steps in Constructing a Solderless
Breadboard Circuit
Building a solderless breadboard project is merely a matter of placing the electronic compo-
nents into the tie points and then completing the circuit using jumper wires. Start with a
schematic or other plan, as shown in Figure 32- 5.
1. Identify the components of the circuit and collect them before you begin. There’s noth-
ing worse than starting to build a circuit, only to discover you’re missing some impor-
tant part.
2. Visualize the best placement for the components. On simple circuits this is easy to do,
as you’ll have plenty of room. On more complex projects you’ll want to carefully plan
the best spot for each part, so that everything will fit.
3. Place the parts into the tie points of the breadboard starting from one end of the sche-
matic and proceeding to the other. For the example circuit, the “ends” are the + and
power leads, but on others it could be a signal input or a sensor output. I’ve elected
to start with the LED, as it’s the largest of the components.
4. Finish the construction by adding any jumper wires that are needed, including the
power leads.
G Though the breadboard is constructed with columns and rows at right angles, there’s no rule
that says you must place parts in such rigid rank- and- file order. Feel free to turn parts this way
and that, to take best advantage of the tie points.
Making Long- Lasting Solderless Circuits
Of course, you already know solderless breadboards are not “intended” for permanent cir-
cuits. But if your aim is to build a circuit on a solderless breadboard and keep it that way,
you’ll want to ensure a solid construction. Bird’s- nest wiring and loose components just won’t
cut it.
32-chapter-32.indd 411 4/21/11 11:56 AM