Page 191 - Six Sigma for electronics design and manufacturing
P. 191
Six Sigma for Electronics Design and Manufacturing
                     160
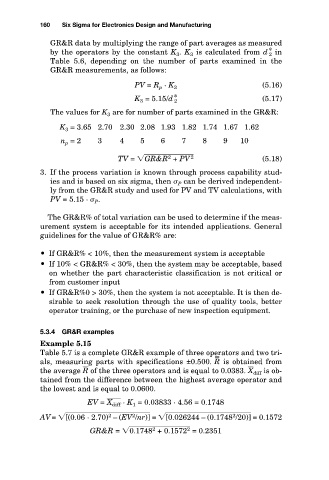
                        GR&R data by multiplying the range of part averages as measured
                        by the operators by the constant K 3 . K 3 is calculated from d * in
                                                                            2
                        Table  5.6,  depending  on  the  number  of  parts  examined  in  the
                        GR&R measurements, as follows:
                                            PV = R p · K 3
                                            K 3 = 5.15/d *
                                                                           (5.17)
                                                      2
                        The values for K 3 are for number of parts examined in the GR&R:
                          K 3 = 3.65 2.70 2.30 2.08 1.93 1.82 1.74 1.67 1.62  (5.16)
                          n p = 2  3     4    5   6    7    8    9   10
                                        TV =  G  R & R  +  P V   2         (5.18)
                                                    2
                     3. If the process variation is known through process capability stud-
                        ies and is based on six sigma, then   P can be derived independent-
                        ly from the GR&R study and used for PV and TV calculations, with
                        PV = 5.15 ·   P .
                       The GR&R% of total variation can be used to determine if the meas-
                     urement system is acceptable for its intended applications. General
                     guidelines for the value of GR&R% are:
                       If GR&R% < 10%, then the measurement system is acceptable
                       If 10% < GR&R% < 30%, then the system may be acceptable, based
                        on whether the part characteristic classification is not critical or
                        from customer input
                       If GR&R%0 > 30%, then the system is not acceptable. It is then de-
                        sirable to seek resolution through the use of quality tools, better
                        operator training, or the purchase of new inspection equipment.
                     5.3.4  GR&R examples
                     Example 5.15
                     Table 5.7 is a complete GR&R example of three operators and two tri-
                                                               – –
                     als,  measuring  parts  with  specifications  ±0.500. R is  obtained  from
                     the average R   of the three operators and is equal to 0.0383. X   diff is ob-
                     tained from the difference between the highest average operator and
                     the lowest and is equal to 0.0600.
                                     X
                                 EV = X   diff · K 1 = 0.03833 · 4.56 = 0.1748
                                                                    2
                                            2
                                      2
                     AV=  [(  0 .0 6  ·  2 .7 0 )  –  ( E V  / n r) ]  =  [0 .0 2 6 2 4 4  –  ( 0 .1 7 4 8  / 2 0 )]  = 0.1572
                                                         2
                                                2
                                 GR&R =  0  .1 7 4 8  +  0 .1 5 7 2   = 0.2351

