Page 233 - Analysis and Design of Machine Elements
P. 233
211
                           Steps           Computation                             Results  Gear Drives  Units

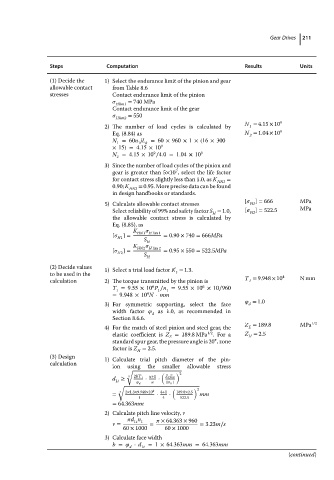
                           (1) Decide the  1) Select the endurance limit of the pinion and gear
                           allowable contact  from Table 8.6
                           stresses          Contact endurance limit of the pinion
                                                 Hlim1  = 740 MPa
                                             Contact endurance limit of the gear
                                                 Hlim2  = 550
                                                                                   N = 4.15 × 10 9
                                           2) The number of load cycles is calculated by  1
                                             Eq. (8.84) as                         N = 1.04 × 10 9
                                                                                    2
                                             N =60n jL = 60 × 960 × 1 × (16 × 300
                                              1
                                                    1
                                                      h
                                             × 15) = 4.15 × 10 9
                                                         9
                                             N =4.15 × 10 ∕4.0=1.04 × 10 9
                                              2
                                           3) Since the number of load cycles of the pinion and
                                                               7
                                             gear is greater than 5×10 ,selectthe life factor
                                             for contact stress slightly less than 1.0, as K  HN1  =
                                             0.90; K  HN2 = 0.95. More precise data can be found
                                             in design handbooks or standards.
                                                                                   [   ] = 666     MPa
                                           5) Calculate allowable contact stresses  H1
                                             Select reliability of 99% and safety factor S = 1.0,  [   ] = 522.5  MPa
                                                                          H         H2
                                             the allowable contact stress is calculated by
                                             Eq. (8.85), as
                                                   K
                                             [   ]=  HN1 H lim 1  = 0.90 × 740 = 666MPa
                                              H1      S H
                                                   K
                                             [   ]=  HN2 H lim 2  = 0.95 × 550 = 522.5MPa
                                              H2      S
                                                       H
                           (2) Decide values  1) Select a trial load factor K = 1.3.
                           to be used in the                   t                              4
                                                                                    1
                           calculation     2) The torque transmitted by the pinion is  T = 9.948 × 10  Nmm
                                                        6
                                                                       6
                                             T =9.55 × 10 P ∕n =9.55 × 10 × 10∕960
                                              1
                                                            1
                                                          1
                                                       4
                                             =9.948 × 10 N ⋅ mm
                                                                                      = 1.0
                                           3) For symmetric supporting, select the face  d
                                             width factor     as 1.0, as recommended in
                                                        d
                                             Section 8.6.6.
                                                                                   Z = 189.8       MPa 1/2
                                           4) For the match of steel pinion and steel gear, the  E
                                                                        1/2
                                             elastic coefficient is Z = 189.8 MPa . For a  Z = 2.5
                                                                                    H
                                                             E
                                                                          ∘
                                             standard spur gear, the pressure angle is 20 , zone
                                             factor is Z = 2.5.
                                                    H
                           (3) Design      1) Calculate trial pitch diameter of the pin-
                           calculation
                                             ion  using  the  smaller  allowable  stress
                                                 √
                                                           (   ) 2
                                                 3  2KT 1  u+1  Z E Z H
                                             d ≥      ⋅   ⋅
                                              1t        u   [   H ]
                                                       d
                                              √
                                                              (     ) 2
                                               3  2×1.3×9.948×10 4  4+1  189.8×2.5
                                             =           ⋅   ⋅        mm
                                                    1      4    522.5
                                             = 64.363mm
                                           2) Calculate pitch line velocity, v
                                                   d n      × 64.363 × 960
                                                   1t 1
                                             v =        =             = 3.23m∕s
                                                60 × 1000   60 × 1000
                                           3) Calculate face width
                                             b =    ⋅ d  =1 × 64.363mm =64.363mm
                                                  d  1t
                                                                                                (continued)

