Page 234 - Analysis and Design of Machine Elements
P. 234
Analysis and Design of Machine Elements
                   212
                        Steps            Computation                            Results         Units
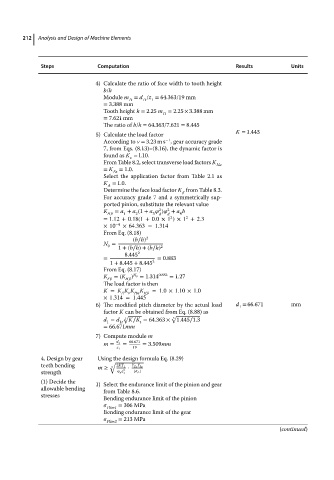
                                        4) Calculate the ratio of face width to tooth height
                                          b/h
                                          Module m = d /z = 64.363/19 mm
                                                        1
                                                  1t
                                                      1t
                                          = 3.388 mm
                                          Tooth height h = 2.25 m = 2.25 × 3.388 mm
                                                           1t
                                          = 7.621 mm
                                          The ratio of b/h = 64.363/7.621 = 8.445
                                                                                K = 1.443
                                        5) Calculate the load factor
                                                            −1
                                          According to v = 3.23 m s , gear accuracy grade
                                          7, from Eqs. (8.13)–(8.16), the dynamic factor is
                                          found as K = l.10.
                                                  v
                                          From Table 8.2, select transverse load factors K
                                                                           Ha
                                          = K  = 1.0.
                                             Fa
                                          Select the application factor from Table 2.1 as
                                          K = 1.0.
                                           A
                                          Determine the face load factor K from Table 8.3.

                                          For accuracy grade 7 and a symmetrically sup-
                                          ported pinion, substitute the relevant value
                                                          2
                                                             2
                                          K  = a + a (1 + a    )   + a b
                                           H    1  2    3  d  d  4
                                                             2
                                                                  2
                                          =1.12 + 0.18(1 + 0.0×1 )×1 +2.3
                                          ×10 −4  ×64.363=1.314
                                          From Eq. (8.18)
                                                   (b∕h) 2
                                          N =
                                           0  1 +(b∕h)+(b∕h) 2
                                                8.445 2
                                          =               = 0.883
                                            1 + 8.445 + 8.445 2
                                          From Eq. (8.17)
                                          K  =(K ) N 0 = 1.314 0.883  = 1.27
                                           F     H
                                          The load factor is then
                                          K = K K K K H    =1.0×1.10 × 1.0
                                                 v
                                               A
                                                   H
                                          ×1.314 = 1.445
                                        6) The modified pitch diameter by the actual load  d = 66.671  mm
                                                                                 1
                                          factor K can be obtained from Eq. (8.88) as
                                                √             √
                                          d = d 1t  3  K∕K = 64.363 ×  3  1.445∕1.3
                                                     t
                                           1
                                          = 66.671mm
                                        7) Compute module m
                                                  66.671
                                              d 1
                                          m =   =    = 3.509mm
                                              z 1  19
                        4. Design by gear  Using the design formula Eq. (8.29)
                        teeth bending    m ≥  √  2KT 1 2 ⋅  Y Fa Y Sa
                                            3
                        strength                 d z 1  [   F ]
                        (1) Decide the  1) Select the endurance limit of the pinion and gear
                        allowable bending  from Table 8.6.
                        stresses
                                          Bending endurance limit of the pinion
                                             Flim1  = 306 MPa
                                          Bending endurance limit of the gear
                                             Flim2  = 213 MPa
                                                                                             (continued)

