Page 235 - Analysis and Design of Machine Elements
P. 235
213
                           Steps           Computation                             Results  Gear Drives  Units
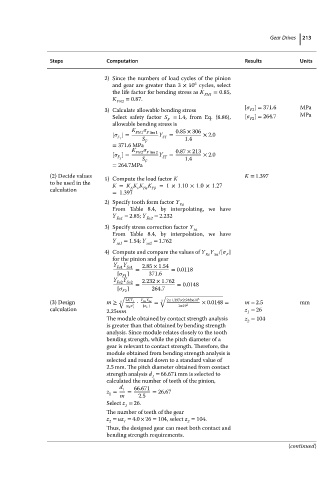
                                           2) Since the numbers of load cycles of the pinion
                                                                    6
                                             and gear are greater than 3 × 10 cycles, select
                                             the life factor for bending stress as K  = 0.85,
                                                                       FN1
                                             K   = 0.87.
                                              FN2
                                                                                   [   ] = 371.6   MPa
                                           3) Calculate allowable bending stress    F1
                                             Select safety factor S = 1.4, from Eq. (8.86),  [   ] = 264.7  MPa
                                                             F                      F2
                                             allowable bending stress is
                                                  K            0.85 × 306
                                             [   ]=  FN1 F lim 1  Y  =  × 2.0
                                              F 1    S F   ST     1.4
                                             = 371.6 MPa
                                                  K            0.87 × 213
                                             [   ]=  FN2 F lim 2  Y  =  × 2.0
                                              F 2    S F   ST     1.4
                                             = 264.7MPa
                           (2) Decide values  1) Compute the load factor K         K = 1.397
                           to be used in the  K = K K K K  =1 × 1.10 × 1.0×1.27
                           calculation            A  v  F    F
                                             =1.397
                                           2) Specify tooth form factor Y
                                                                Fa
                                             From Table8.4,byinterpolating,wehave
                                             Y  = 2.85; Y  = 2.232
                                              Fa1      Fa2
                                           3) Specify stress correction factor Y
                                                                    sa
                                             From Table 8.4, by interpolation, we have
                                             Y  = 1.54; Y  = 1.762
                                              sa1      sa2
                                           4) Compute and compare the values of Y Y /[   ]
                                                                        Fa  Sa  F
                                             for the pinion and gear
                                             Y Fa1 Sa1  =  2.85 × 1.54  = 0.0118
                                                Y
                                              [   ]    371.6
                                                F1
                                             Y  Y    2.232 × 1.762
                                              Fa2 Sa2  =       = 0.0148
                                              [   ]     264.7
                                                F2
                                                          √
                                              √            3 2×1.397×9.948×10 4
                           (3) Design      m ≥  3  2KT 1 2 ⋅  Y Fa Y Sa  =  1×19 2  × 0.0148 =  m = 2.5  mm
                                                      [   F ]
                                                    d z
                           calculation     2.25mm  1                               z = 26
                                                                                    1
                                           The module obtained by contact strength analysis  z = 104
                                                                                    2
                                           is greater than that obtained by bending strength
                                           analysis. Since module relates closely to the tooth
                                           bending strength, while the pitch diameter of a
                                           gear is relevant to contact strength. Therefore, the
                                           module obtained from bending strength analysis is
                                           selected and round down to a standard value of
                                           2.5 mm. The pitch diameter obtained from contact
                                           strength analysis d = 66.671 mm is selected to
                                                        1
                                           calculated the number of teeth of the pinion,
                                               d   66.671
                                           z =  1  =    = 26.67
                                            1  m    2.5
                                           Select z = 26.
                                                1
                                           The number of teeth of the gear
                                           z = uz = 4.0 × 26 = 104, select z = 104.
                                            2   1                 2
                                           Thus, the designed gear can meet both contact and
                                           bending strength requirements.
                                                                                                (continued)

