Page 238 - Analysis and Design of Machine Elements
P. 238
Analysis and Design of Machine Elements
                   216
                        Steps          Computation                                Results       Units
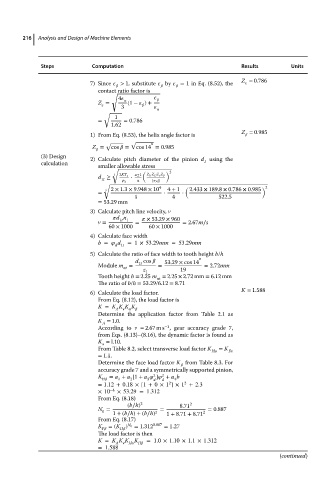
                                                                                  Z = 0.786
                                      7) Since    > 1, substitute    by    = 1 in Eq. (8.52), the


                                         contact ratio factor is
                                            √
                                               4
                                         Z =        (1 −    )+
                                               3

                                          √
                                             1
                                         =      = 0.786
                                            1.62
                                                                                  Z = 0.985
                                      1) From Eq. (8.53), the helix angle factor is
                                                  √
                                           √            ∘
                                       Z =  cos    =  cos 14 = 0.985

                        (3) Design    2) Calculate pitch diameter of the pinion d using the
                        calculation                                    1
                                         smaller allowable stress
                                             √
                                                     (      ) 2
                                             3  2KT 1  u±1  Z H Z E Z    Z
                                         d ≥      ⋅
                                          1t        u   [   H ]
                                                  d
                                          √
                                           3 2 × 1.3 × 9.948 × 10 4  4 + 1  ( 2.433 × 189.8 × 0.786 × 0.985  ) 2
                                         =                  ⋅    ⋅
                                                   1          4            522.5
                                         = 53.29 mm
                                      3) Calculate pitch line velocity, v
                                               d n      × 53.29 × 960
                                         v =   1t 1  =           = 2.67m∕s
                                            60 × 1000  60 × 1000
                                      4) Calculate face width
                                         b =    d  =1 × 53.29mm =53.29mm
                                              d 1t
                                      5) Calculate the ratio of face width to tooth height b/h
                                                                      ∘
                                                   d cos     53.29 × cos 14
                                                    1t
                                         Module m =       =            = 2.72mm
                                                nt
                                                      z 1       19
                                         Tooth height h = 2.25 m = 2.25 × 2.72 mm = 6.12 mm
                                                          nt
                                         The ratio of b/h = 53.29/6.12 = 8.71
                                                                                  K = 1.588
                                      6) Calculate the load factor.
                                         From Eq. (8.12), the load factor is
                                         K = K K K K
                                              A
                                                v

                                         Determine the application factor from Table 2.1 as
                                         K = 1.0.
                                          A
                                                            −1
                                         According to v = 2.67 m s , gear accuracy grade 7,
                                         from Eqs. (8.13)–(8.16), the dynamic factor is found as
                                         K = l.10.
                                          v
                                         From Table 8.2, select transverse load factor K  = K
                                                                         Ha   Fa
                                         = 1.1.
                                         Determine the face load factor K from Table 8.3. For

                                         accuracy grade 7 and a symmetrically supported pinion,
                                                           2
                                                         2
                                         K H    = a + a [1 + a    ]   + a b
                                              1
                                                       3
                                                  2
                                                               4
                                                         d
                                                           d
                                                             2
                                                                  2
                                         =1.12 + 0.18 × [1 + 0 × 1 ]×1 +2.3
                                         ×10 −4  ×53.29 = 1.312
                                         From Eq. (8.18)
                                                 (b∕h) 2        8.71 2
                                         N =              =             = 0.887
                                          0  1 +(b∕h)+(b∕h) 2  1 + 8.71 + 8.71 2
                                         From Eq. (8.17)
                                         K  =(K ) N 0 = 1.312 0.887  = 1.27
                                          F    H
                                         The load factor is then
                                         K = K K K K H    =1.0×1.10 × 1.1×1.312
                                              A
                                                 H
                                                v
                                         =1.588
                                                                                             (continued)

