Page 243 - Analysis and Design of Machine Elements
P. 243
221
                                                                                          Gear Drives
                               Steps                    Computation                   Results      Units
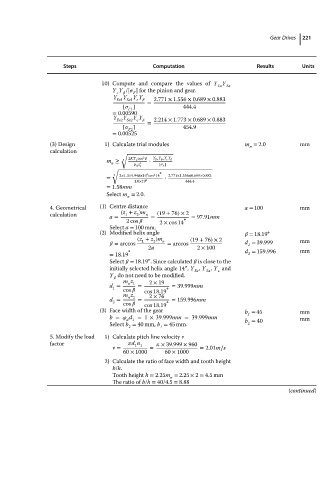
                                          10) Compute and compare the values of Y Y  Sa
                                                                           Fa
                                             Y Y /[   ] for the pinion and gear.


                                                   F
                                                   Y Y
                                                Y
                                             Y Fa1 Sa1        2.771 × 1.556 × 0.689 × 0.883
                                                       =
                                                [   ]            444.4
                                                 F1
                                             = 0.00590
                                             Y  Y  Y Y
                                              Fa2 Sa2        2.214 × 1.773 × 0.689 × 0.883
                                                       =
                                                [   ]            454.9
                                                 F2
                                             = 0.00525
                           (3) Design      1) Calculate trial modules              m = 2.0         mm
                                                                                    n
                           calculation
                                               √
                                           m ≥  3  2KT 1 cos 2     ⋅  Y Fa Y Sa Y    Y
                                            n        2
                                                      d z 1  [   F ]
                                             √            ∘
                                                       4
                                             3  2×1.3×9.948×10 cos 2 14  2.771×1.556×0.689×0.883
                                           =                ⋅
                                                   1.0×19 2       444.4
                                           = 1.58mm
                                           Select m = 2.0.
                                                 n
                           4. Geometrical  (1) Centre distance                     a = 100         mm
                           calculation         (z + z )m n  (19 + 76)× 2
                                                    2
                                                1
                                            a =         =        ∘  = 97.91mm
                                                 2cos     2 × cos 14
                                            Select a = 100 mm.
                                         (2) Modified helix angle                      = 18.19 ∘
                                                    (z + z )m      (19 + 76)× 2                    mm
                                               = arccos  1  2  n  = arccos         d = 39.999
                                                                                    1
                                                       2a            2 × 100
                                                 ∘                                 d = 159.996     mm
                                            = 18.19                                 2
                                                       ∘
                                            Select    = 18.19 .Since calculated    is close to the
                                                                  ∘
                                            initially selected helix angle 14 , Y , Y , Y and

                                                                        Sa
                                                                    Fa
                                            Y do not need to be modified.

                                                m z    2 × 19
                                            d =  n 1  =     ∘  = 39.999mm
                                             1
                                                cos     cos 18.19
                                                m z    2 × 76
                                                 n 2
                                            d =     =       ∘  = 159.996mm
                                             2
                                                cos     cos 18.19
                                         (3) Face width of the gear                b = 45          mm
                                            b =    d =1 × 39.999mm =39.999mm        1              mm
                                                 d 1                               b = 40
                                            Select b = 40 mm, b = 45 mm.            2
                                                 2         1
                           5. Modify the load  1) Calculate pitch line velocity v
                           factor                  d n      × 39.999 × 960
                                                   1 1
                                             v =        =             = 2.01m∕s
                                                60 × 1000   60 × 1000
                                           2) Calculate the ratio of face width and tooth height
                                             b/h.
                                             Tooth height h = 2.25m = 2.25 × 2 = 4.5 mm
                                                             n
                                             The ratio of b/h = 40/4.5 = 8.88
                                                                                                (continued)

