
Page 366 - 02. Subyek Computer Aided Design - Beginner’s Guide to SOLIDWORKS 2019- Level 1 by Alejandro Reyes
P. 366
Detail Drawing
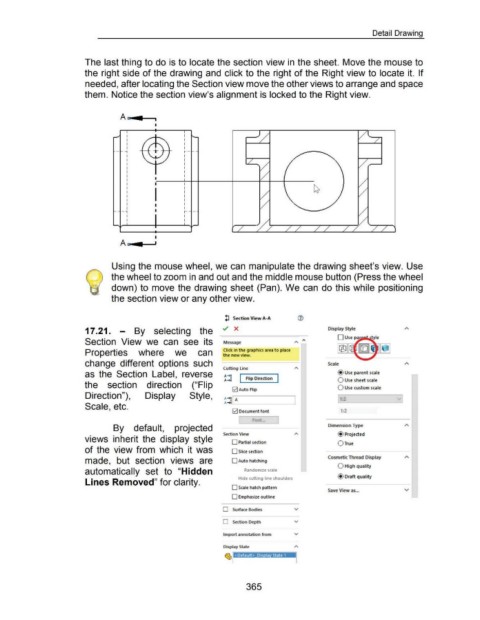
The last thing to do is to locate the section view in the sheet. Move the mouse to
the right side of the drawing and click to the right of the Right view to locate it. If
needed, after locating the Section view move the other views to arrange and space
them. Notice the section view's alignment is locked to the Right view.
A~
I
I I
I I
I I
I I
- "1 t--
I
I
I
I
I
I
I
I I
I
I I
I
I
I I
I
-1 I r- -
I I
I I
I
A~
Using the mouse wheel, we can manipulate the drawing sheet's view. Use
the wheel to zoom in and out and the middle mouse button (Press the wheel
down) to move the drawing sheet (Pan). We can do this while positioning
the section view or any other view.
!J Section View A-A (i)
17 .21. - By selecting the Display Style
0 Us e p a liilllllii
Section View we can see its Message " 1'\
Click in the graphics area to place
Properties where we can the new view.
change different options such Scale
Cutting line
as the Section Label, reverse ~~~ @Use parent scale
1..-Fr-,p -Dir-ect- io-n --.
0 Use sheet scale
the section direction ("Flip
!;2)Auto Flip 0 Use custom scale
Direction"), Display Style,
A-+!l A 1:2
Scale, etc. A-+1.__. ----------'
0 Document font 1:2
By default, projected Dimension Type
Section View @Projected
views inherit the display style 0 Partial section 0 True
of the view from which it was 0 Slice section
Cosmetic Thread Display
made, but section views are 0 Auto hatching
0 High quality
automatically set to "Hidden Randomize scale
Hide cuttmg line shoulders @Draft quality
Lines Removed" for clarity.
0 Scale hatch pattern
Save View as ... v
0 Emphasize outline
0 Surface Bodies v
0 Section Depth v
Import annotation from v
Display State
365