
Page 519 - 02. Subyek Computer Aided Design - Beginner’s Guide to SOLIDWORKS 2019- Level 1 by Alejandro Reyes
P. 519
Beginner's Guide to SOLIDWORKS 2019- Level I
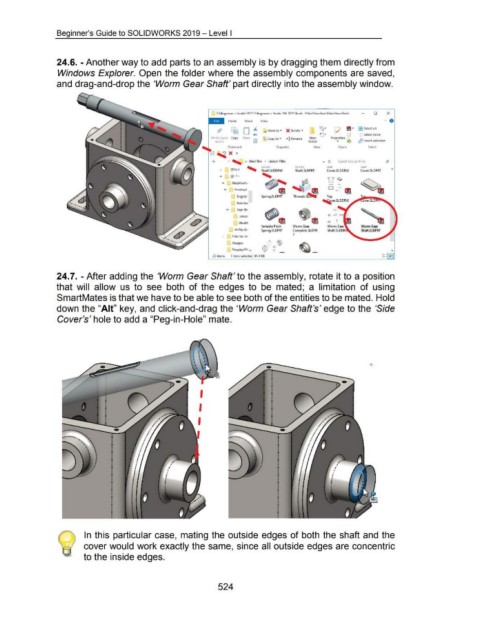
24.6. -Another way to add parts to an assembly is by dragging them directly from
Windows Explorer. Open the folder where the assembly components are saved,
and drag-and-drop the 'Worm Gear Shaft' part directly into the assembly window.
- 0 X
Home Share View " 8
D "" tJ •
- J, ., Move to • X Delete • 1{0· 1-'1 m • 133 Select all
v
Pin to Quick Copy Paste r~l '@ Copy to • ~ Rename New Properties gg Select none
0
access I!J folder • ~ 0 -' Invert selection
Clipboard Organize New Open Select
X •
v ' « Gear Box > Lesson Files v Cl Search lesson Files p
> I ' s~~ft.SLDDRW Vlt:llC l JIUIC: ..IIUC ""
Shaft.SLDPRT
Cover.SLDPRT
Cover.SLDDRW
' ~
~
~ ll!
Spring.SLDPRT Threads.$~ Top
~er.SLDDRW
~
v
lll
Variable Pitch Worm Gear Worm Gear
Spring.SL DPRT Complete.SLDPR Shaft.SLDPRT
T
-
22 items 1 item selected 94.4 KB
24.7. - After adding the 'Worm Gear Shaft' to the assembly, rotate it to a position
that will allow us to see both of the edges to be mated; a limitation of using
SmartMates is that we have to be able to see both of the entities to be mated. Hold
down the "Ait" key, and click-and-drag the 'Worm Gear Shaft's' edge to the 'Side
Cover's' hole to add a "Peg-in-Hole" mate.
I
I
I
In this particular case, mating the outside edges of both the shaft and the
cover would work exactly the same, since all outside edges are concentric
to the inside edges.
524