
Page 149 - Enhancing CAD Drawings with Photoshop
P. 149
4386.book Page 132 Monday, November 15, 2004 3:27 PM
132 CHAPTER 4 YOU AND YOUR ENTOURAGE
NOTE You can use metric units if you prefer. This tutorial will use feet and inches. You should use
the system that you are most comfortable with.
Make a box object that has the overall volume of the entourage you are planning to create—in
this case we’ll be making a person. You will use this box as a visual template to guide you in
creating flat plane geometry that you will later map to the entourage material you will be
designing in this tutorial.
2. Press Alt+W if necessary to maximize the current viewport. Press T to switch to the Top
viewport.
3. Click the Create tab of the Command Panel, click the Geometry button, select Standard Prim-
itives from the drop-down, and click the Box tool in the Object Type rollout.
4. Drag out a box in the Top viewport, and adjust its parameters in the Command Panel to have
a length and width of 2´ each (the approximate width of a typical human body), and set the
height to match the height of the person—in this case, set it to 5´8˝.
Before you make the plane object that you will ultimately map your entourage material to, you
need to know the proportions of the image you will be using. You want to match the aspect
ratio of the plane geometry to the image file so that no distortions occur. If the plane is wider
than the image, the figure will stretch and appear wider than it is in real life.
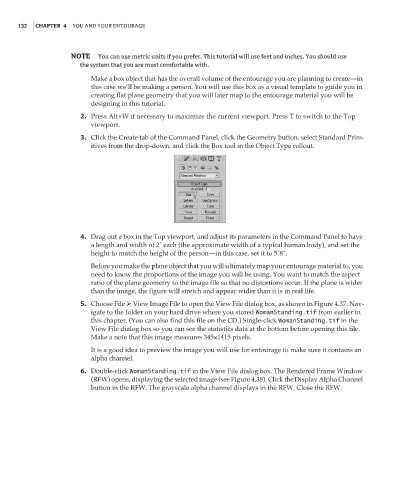
5. Choose File View Image File to open the View File dialog box, as shown in Figure 4.37. Nav-
igate to the folder on your hard drive where you stored WomanStanding.tif from earlier in
this chapter. (You can also find this file on the CD.) Single-click WomanStanding.tif in the
View File dialog box so you can see the statistics data at the bottom before opening this file.
Make a note that this image measures 345×1415 pixels.
It is a good idea to preview the image you will use for entourage to make sure it contains an
alpha channel.
6. Double-click WomanStanding.tif in the View File dialog box. The Rendered Frame Window
(RFW) opens, displaying the selected image (see Figure 4.38). Click the Display Alpha Channel
button in the RFW. The grayscale alpha channel displays in the RFW. Close the RFW.